Overview
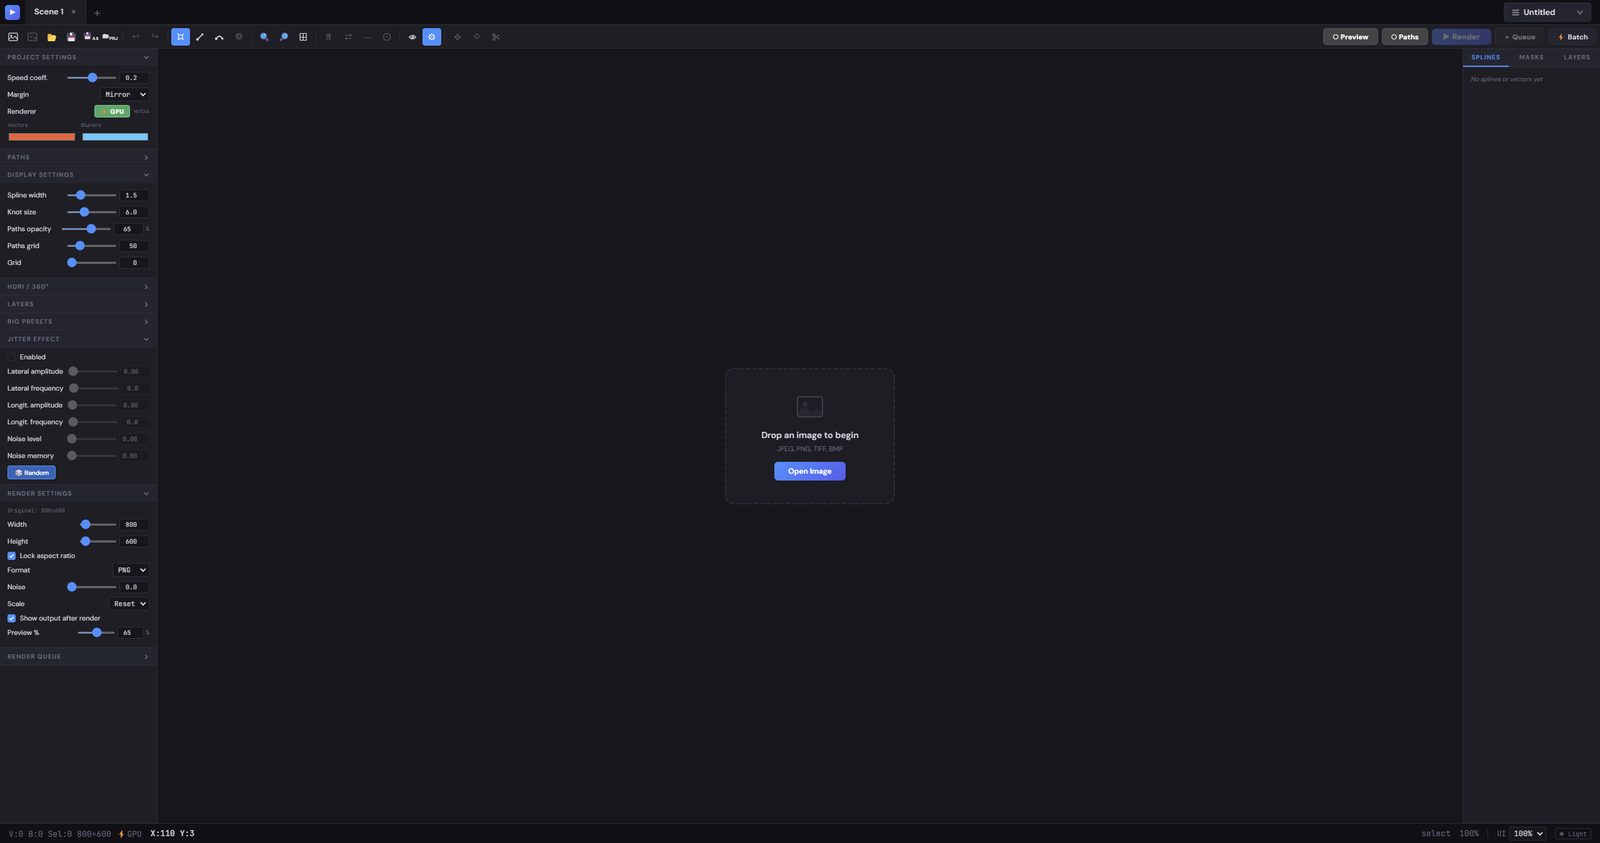
Vector//RIG adds directional motion blur to still images and to 360° panoramas. You describe the movement in the frame with spline curves; the engine builds a vector field from them and smears the pixels along it, so a parked car reads as a car travelling at speed and a stationary wheel reads as a spinning one.
Rendering is multi-threaded, with a GPU path and an automatic CPU fallback. On top of the blur sits a layer system, so separate elements — a reflection, a shadow, a duplicated subject — can each carry their own movement.
This manual describes the interface and the tools first, using the application on its own. The worked examples come at the end, under Case Studies.
Interface Layout
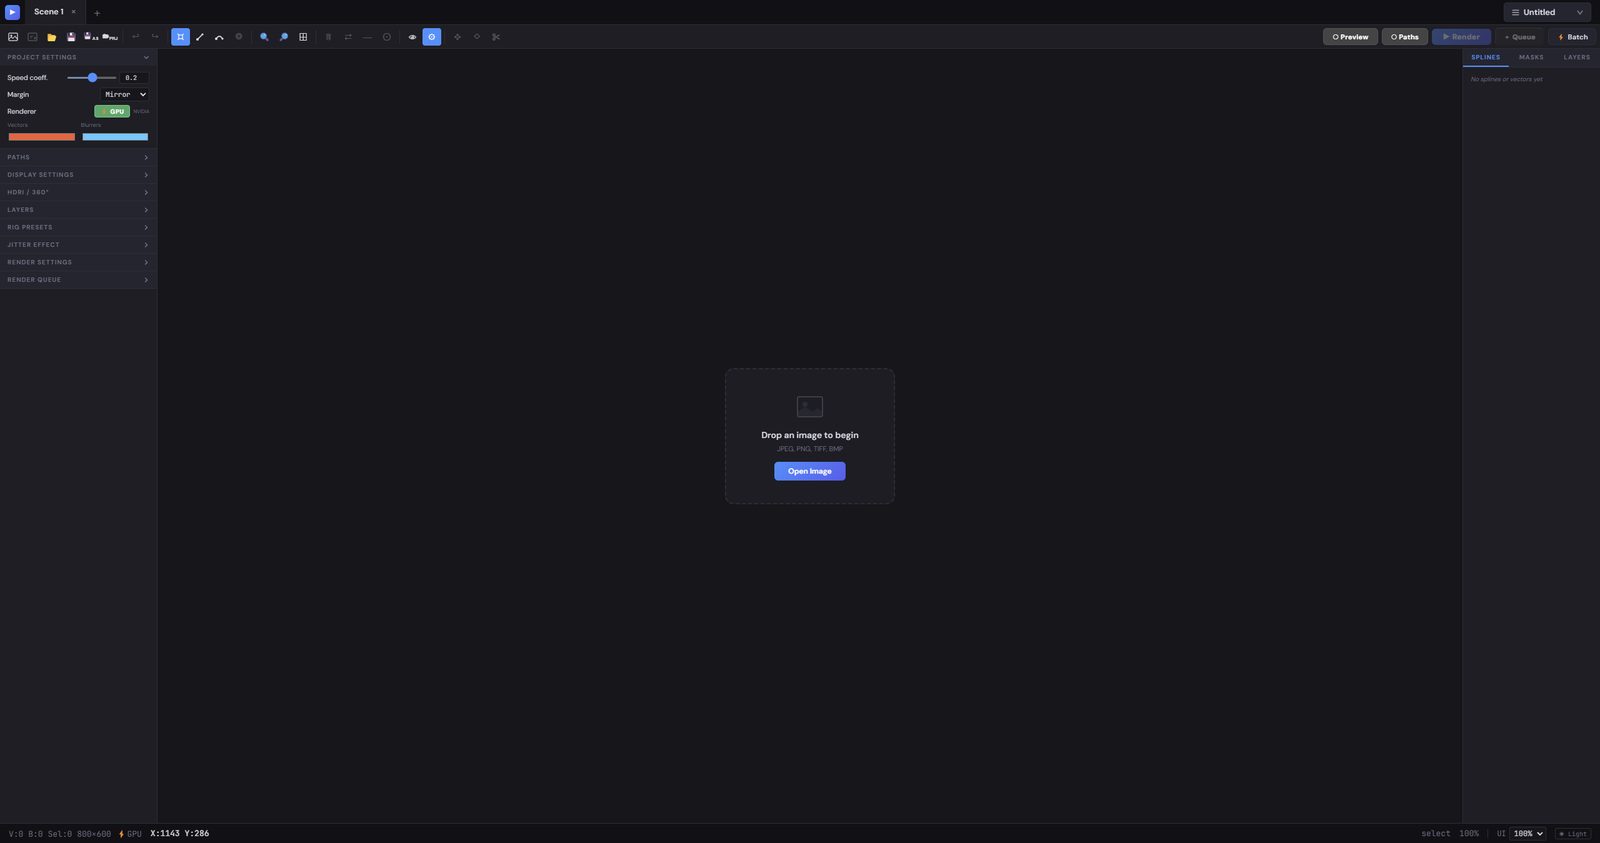
The window is divided into five regions. Across the top, the tab bar holds the open scenes and the toolbar holds the tools and the render controls. Down the left, a column of collapsible settings sections. Down the right, three tabs — splines, masks, layers. The canvas fills the middle, and the status bar reports position, zoom and renderer along the bottom.
Both side panels can be resized by dragging their inner edge, and collapsed entirely when the canvas needs the room.
Basic Workflow
Open an image. Draw one or more blurrer splines along the direction the scene is moving (B). Adjust each spline's start and end coefficients to taper the effect. Mask anything that must stay sharp, add layers for elements that move independently, then switch the preview on to judge it and render when it reads right.
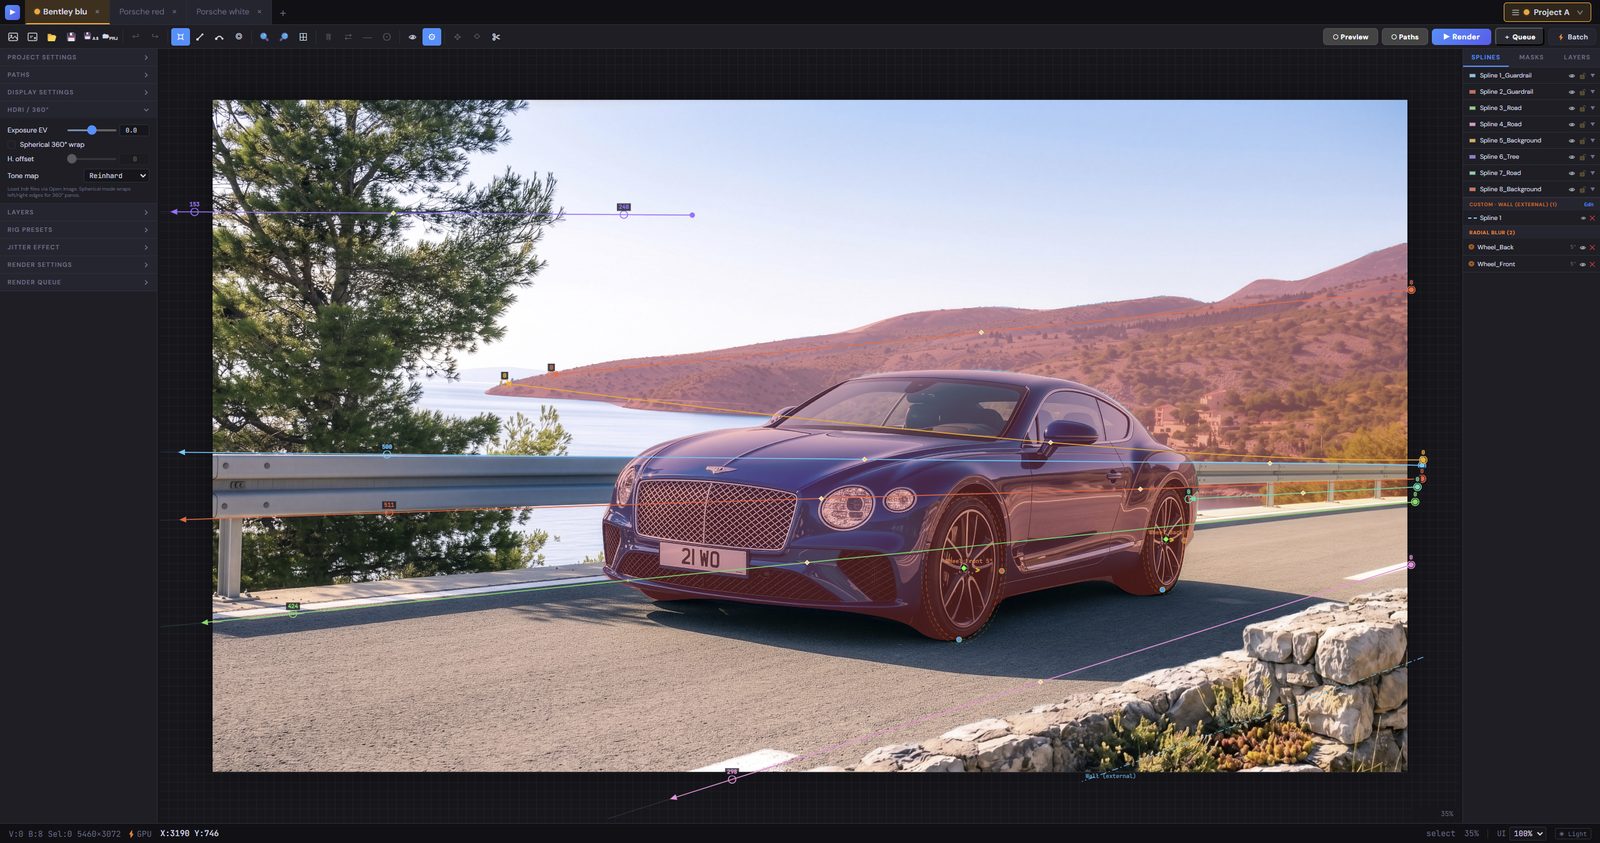
Tab Bar

Each tab is an independent scene with its own image, splines, masks, layers and settings. Ctrl+N adds one, double-clicking a tab renames it, × closes it. Switching tabs does not interrupt a render already running — it carries on in the background and its result is waiting when you come back.
Toolbar

Reading left to right: file operations, undo/redo, the drawing tools, zoom and fit, selection helpers, view toggles, the layer tools, and finally preview, motion paths, and the render and queue buttons.
Left Panel
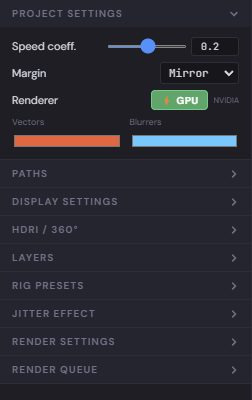
Collapsible sections, each independent of the others: Project Settings (global speed coefficient, margin handling, renderer, object colours), Paths (output, scenes and preview folders for this scene), Display Settings, HDRI / 360°, Layers, Jitter Effect and Render Settings.
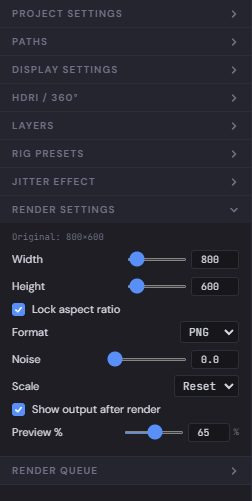
The speed coefficient in Project Settings multiplies every vector in the scene at once — the quickest way to dial the whole effect up or down without touching the splines.
Right Panel
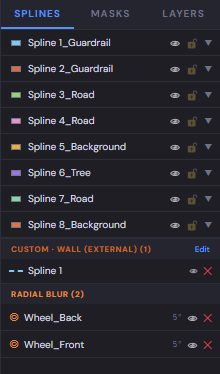
Three tabs. Splines lists the blurrer splines, the individual vectors and the radial blurs. Masks holds mask creation and management. Layers holds the layer stack, with a ⚙ disclosure for each layer's properties and a ⌇ disclosure for its spline assignment.
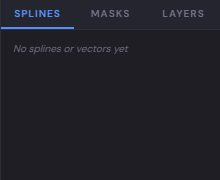
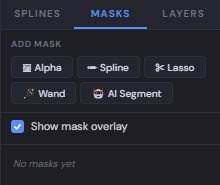
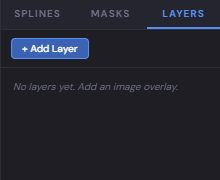
Canvas & Status Bar

Pan with H or the middle mouse button, zoom with the scroll wheel, fit with E. The status bar reports the cursor position in image coordinates, the object counts, the image size, the zoom, and whether the GPU or the CPU path is active.
AI Assistant · start here
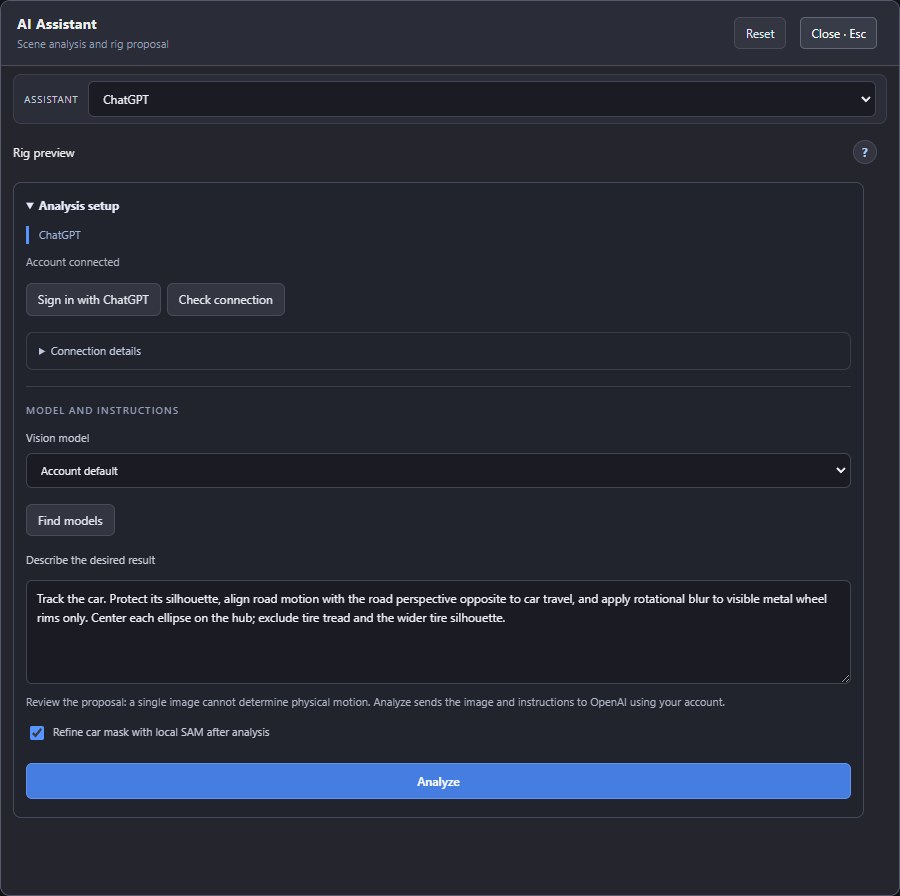
Open the green AI Assistant button beside the rendering controls. The assistant proposes editable motion paths, a car mask and rim radials; review the proposal before applying it. Its preview stays visible while the controls below scroll. Expand Analysis setup to return to the account, model and instructions. The nearby ? buttons explain individual controls.
- Open the image and connect an assistant.
- Describe the desired tracking direction and protected subject. Enable Refine car mask with local SAM after analysis if needed, then press Analyze.
- Wait for model analysis, local road/rim fitting and optional SAM refinement to finish. Stage timings show which operation is running; use Cancel to stop an analysis.
- Review road geometry, mask and wheels, then press Add proposal to scene.
- Edit the resulting objects in the viewport. Enable Tyre for rubber, inspect Compare A/B and render.
AI accounts & models
| Assistant | Connect | Model |
|---|---|---|
| ChatGPT | Install the official Codex runtime on this computer. Use Sign in with ChatGPT, complete account sign-in and press Check connection. Credentials are managed by the runtime in a separate VectorRIG profile. | Account default or an available model returned by Find models. |
| Claude | Install official Claude Code. Use Open Claude Code to sign in, complete its sign-in and then Check connection. Locate Claude Code selects an existing executable if detection fails. Signing into the Claude chat app alone does not connect Claude Code. | Opus by default. Other aliases depend on the account. |
| OpenAI API / Claude API | Optional direct connection with your own OpenAI or Anthropic API key. Save API key to load models automatically, then select an image-capable model from the menu. The model list and last selection are remembered after restarting; Check API connection refreshes them. Keys are encrypted by the operating system in this profile; Remove API key deletes the local credential. API billing goes directly to your provider account, separately from a ChatGPT or Claude subscription. No VectorCredits are required. | Find models queries the selected API account. OpenAI lists the newest available release in each of the GPT-5 and GPT-6 series, with GPT-6 first and dated duplicates hidden when an alias is available. Model access and image support must be enabled by your provider. |
| Qwen · Experimental | Run Ollama locally with a Qwen vision model. Refresh the model list and select the installed model. | Local vision model; geometry may require more correction. |
ChatGPT and Claude analysis sends the image and instructions online through your own account. These connections do not require entering an API key in VectorRIG; availability and limits depend on the account and runtime. Qwen analysis uses local Ollama. SAM refinement is local after its model files have been downloaded.
Reset: Use Reset in the AI Assistant header to cancel pending analysis and clear proposals, diagnostics and manual proposal adjustments for all backends. Then select a backend and model for a fresh analysis. The loaded image, saved credentials and rig already applied to the scene remain unchanged. Saved API model choices remain available after Reset.
Automatic tyre in AI proposals: Wheels & tires can automatically attach sidewall and tread blur to each estimated rim. The metal rim is fitted first. A very strong rubber ridge is checked for a fully supported inner metal contour before acceptance; uncertain boundaries still need manual review. Automatic sidewall and tread share its center, tilt and perspective; only rubber-to-rim diameter, visible tread width and side (Mirror) are estimated separately. Manual cyan/green rotation controls remain available after applying. Local fitting first checks the metal rim, then fits the green outer ellipse with independent horizontal and vertical radii and measures tread width from exposed lower arcs using image pixels and the SAM raster mask when available. With a SAM raster mask, several lower and lateral contour samples refine contact height and visible tread depth. Tread width supports values up to 3 times the horizontal tyre radius for narrow perspective views. Ambiguous rubber boundaries retain an approximate estimate and are reported for manual review. Preview cyan/green guides before applying; the metal rim stays separate. Missing or uncertain estimates stay rim-only. Disable automatic tyre for a rim-only proposal. After applying, refine cyan/green handles and use the fender cutout to protect overlapping bodywork. These are editable 2D estimates, not a 3D reconstruction.
Find models refreshes the runtime list; it does not grant access to a model. If a model is unavailable, check the account and select another available model. A VectorRIG license is separate from your AI subscription.
Review & apply a rig
Rig proposals A / B and Magnify
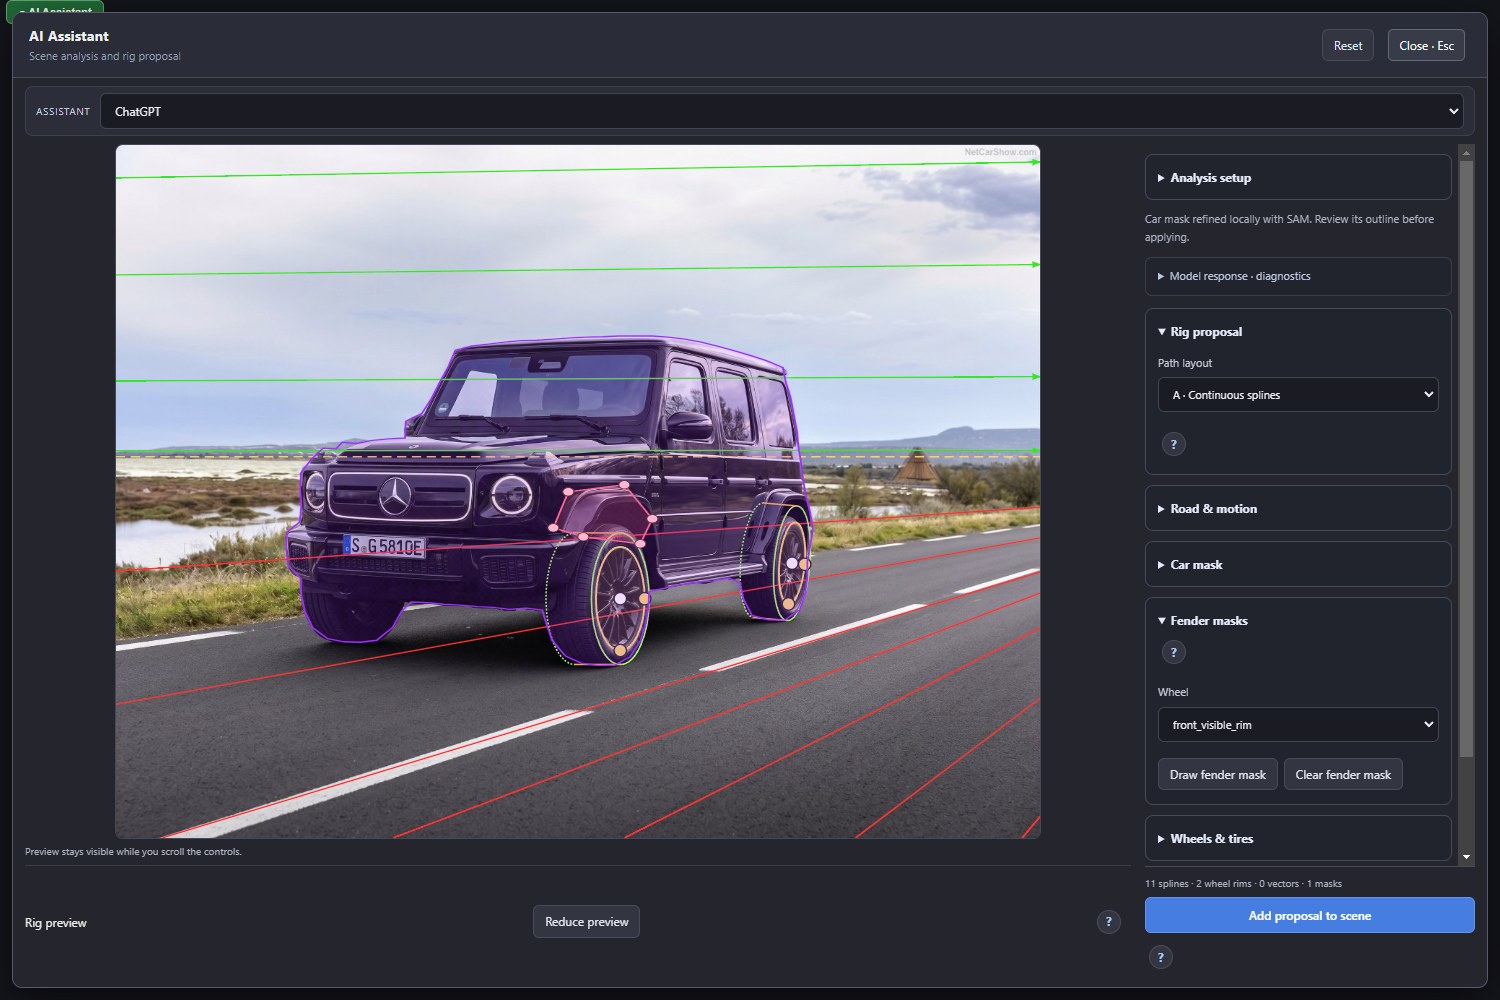
A · Continuous splines is the default for Road tracking. Background paths remain continuous through the car mask. Road paths reach the actual vanishing point, even outside the image, with zero strength at that endpoint. Enable the car mask to protect the vehicle. B · Split at car mask retains the previous segmented layout. Switching proposals preserves wheel adjustments and fender masks.
Magnify expands the assistant with a larger editable preview and controls alongside it. Draw and edit masks in either size. Use Reduce preview or Escape to return without losing edits; a second Escape closes the assistant.
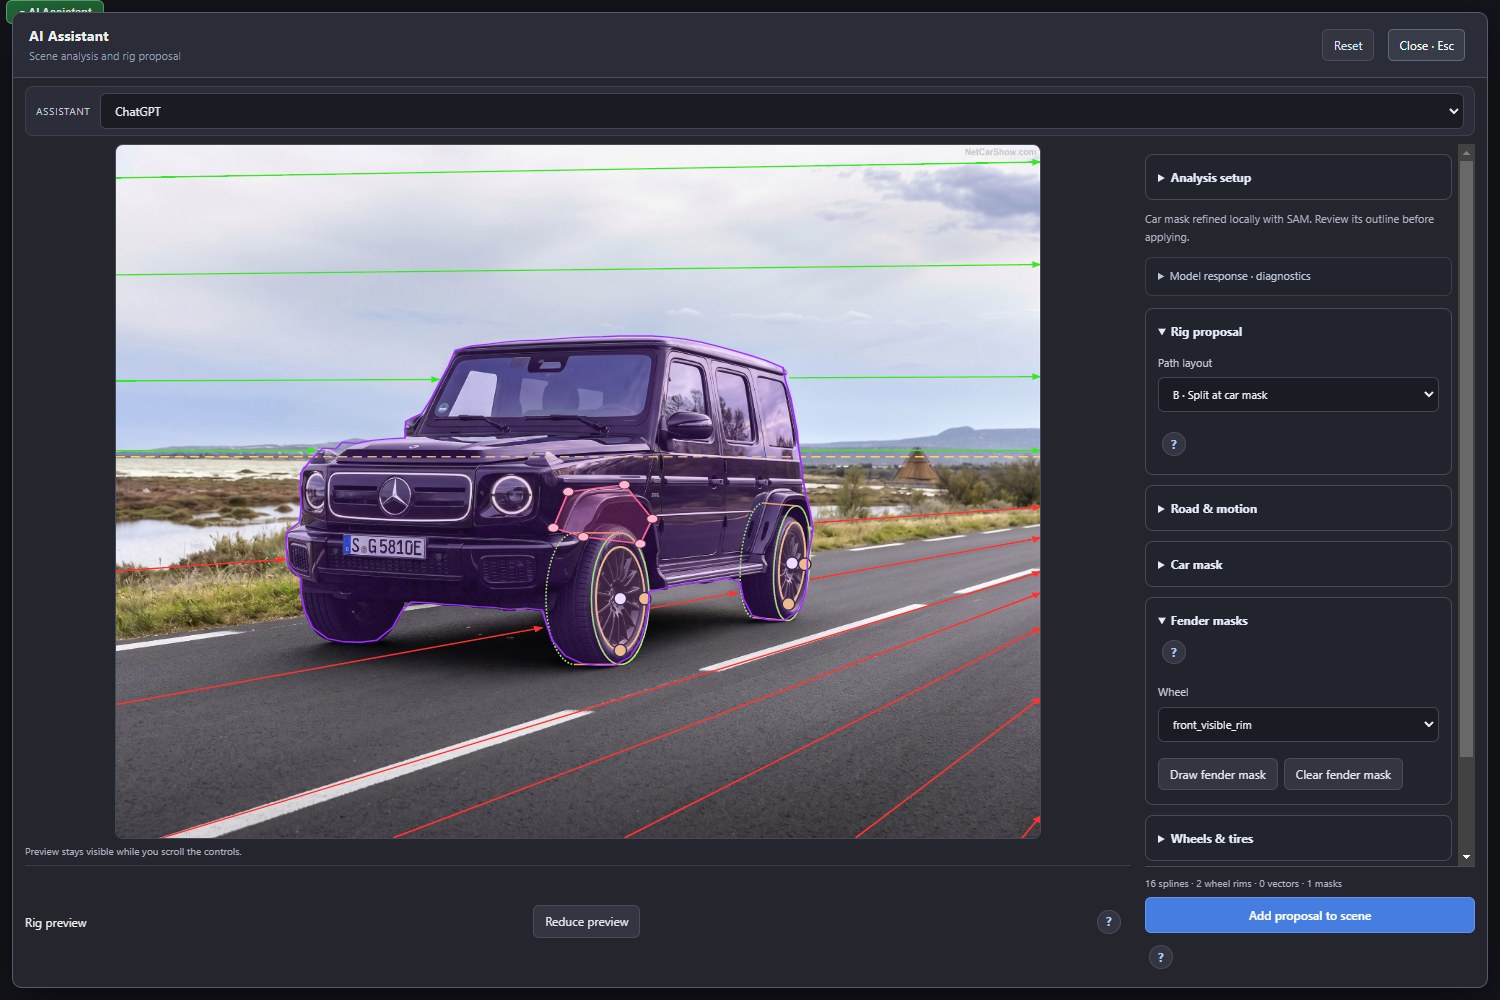
AI mask edges: Background blur rejects foreground samples along the soft AI mask boundary independently of the visible protection mask. This reduces color ghosts without expanding the sharp silhouette. Applies to preview and final CPU/GPU rendering, including HDR. Existing AI masks benefit on the next render; no new analysis is needed. If the outline itself misses the bodywork, correct it with the mask editor.
Fender masks before applying
Open Fender masks, select the wheel and press Draw fender mask. Click along the bodywork that must remain sharp, closing the outline through the body above the wheel. Press Finish fender mask after at least three points. Drag pink nodes to refine the closed spline. Undo fender point removes the latest draft point; Cancel keeps the previous cutout; Clear removes the selected wheel's cutout. Each mask is applied with its wheel and protects against rim and tyre blur, including rim-only proposals. Reset or a fresh analysis clears these proposal masks.
Road & motion
Check the cyan road guides against actual road markings. With Calibrate from road lines, place two points on each of two separate lines. Their intersection gives the road vanishing point, including points outside the frame. Use numeric vanishing point switches to direct coordinates: X=0 is the left edge, X=1 the right edge, and Y increases downward; X=1.25 is a quarter of an image width beyond the right edge.
Measure road from image fits detected markings. Compatible estimates can refine the proposal. A conflicting estimate is offered with Use local road estimate or Keep current road geometry; check the markings before accepting. A small fit residual does not guarantee correct road detection.
Road flow controls towards/away direction independently of the path geometry. In a tracking shot the background moves opposite the car. Adjust Car tracking / background drift, Background slope, Background / road blur and Strength to match the shot. The Ground/background boundary is distinct from road vanishing-point Y and need not coincide with the visible skyline.
Car mask
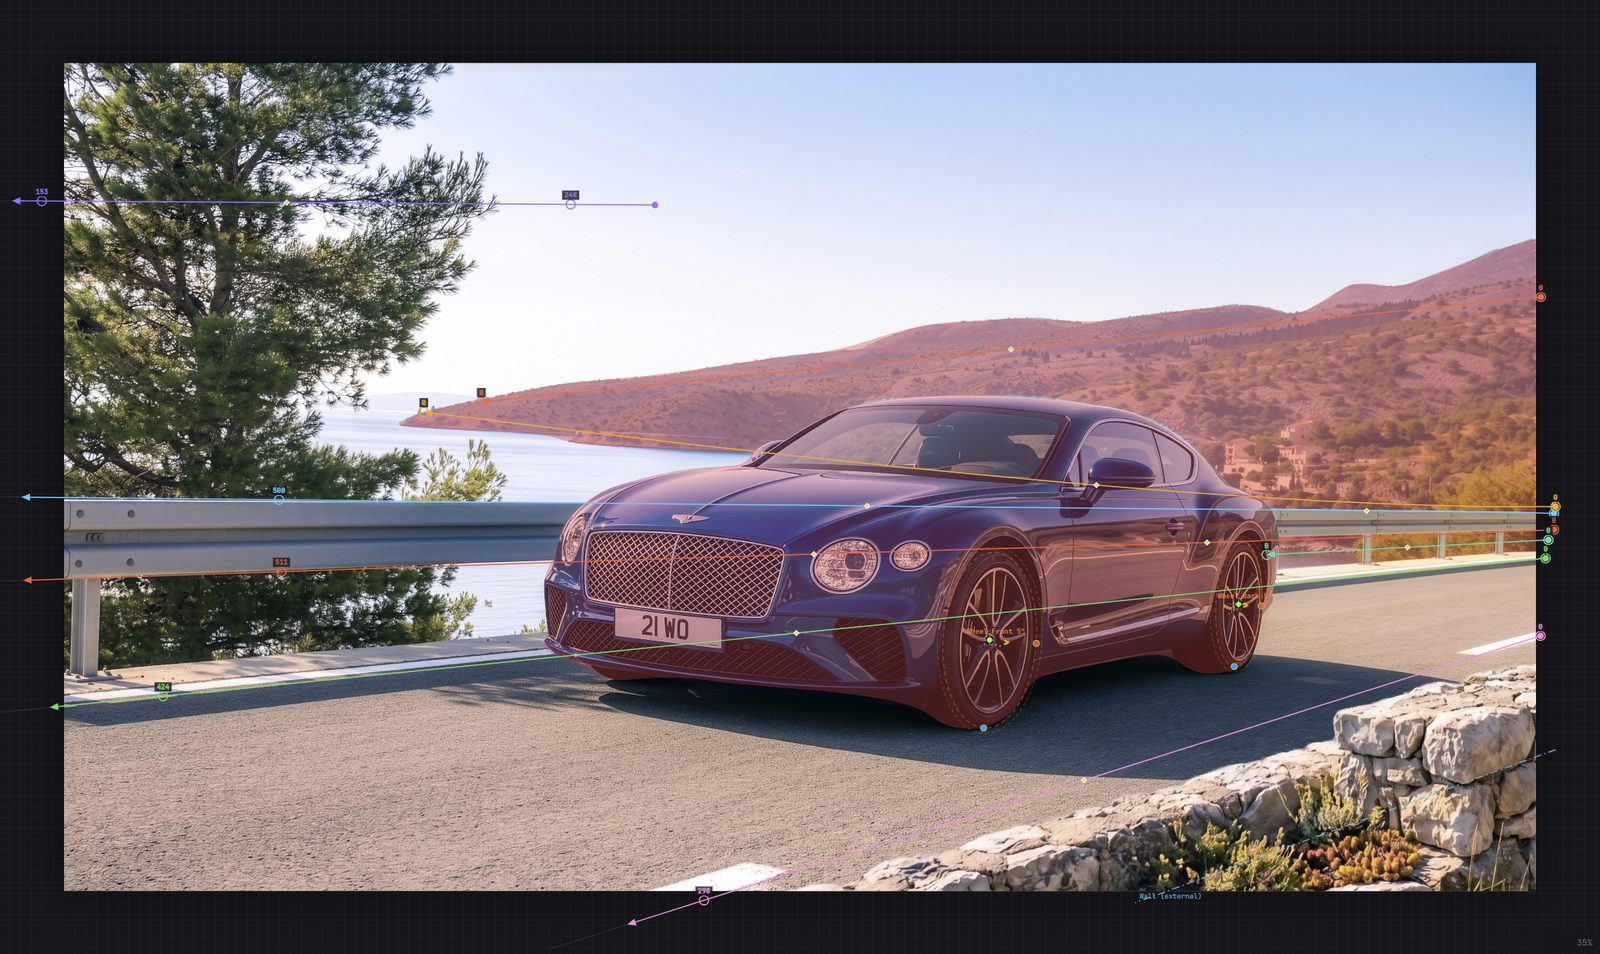
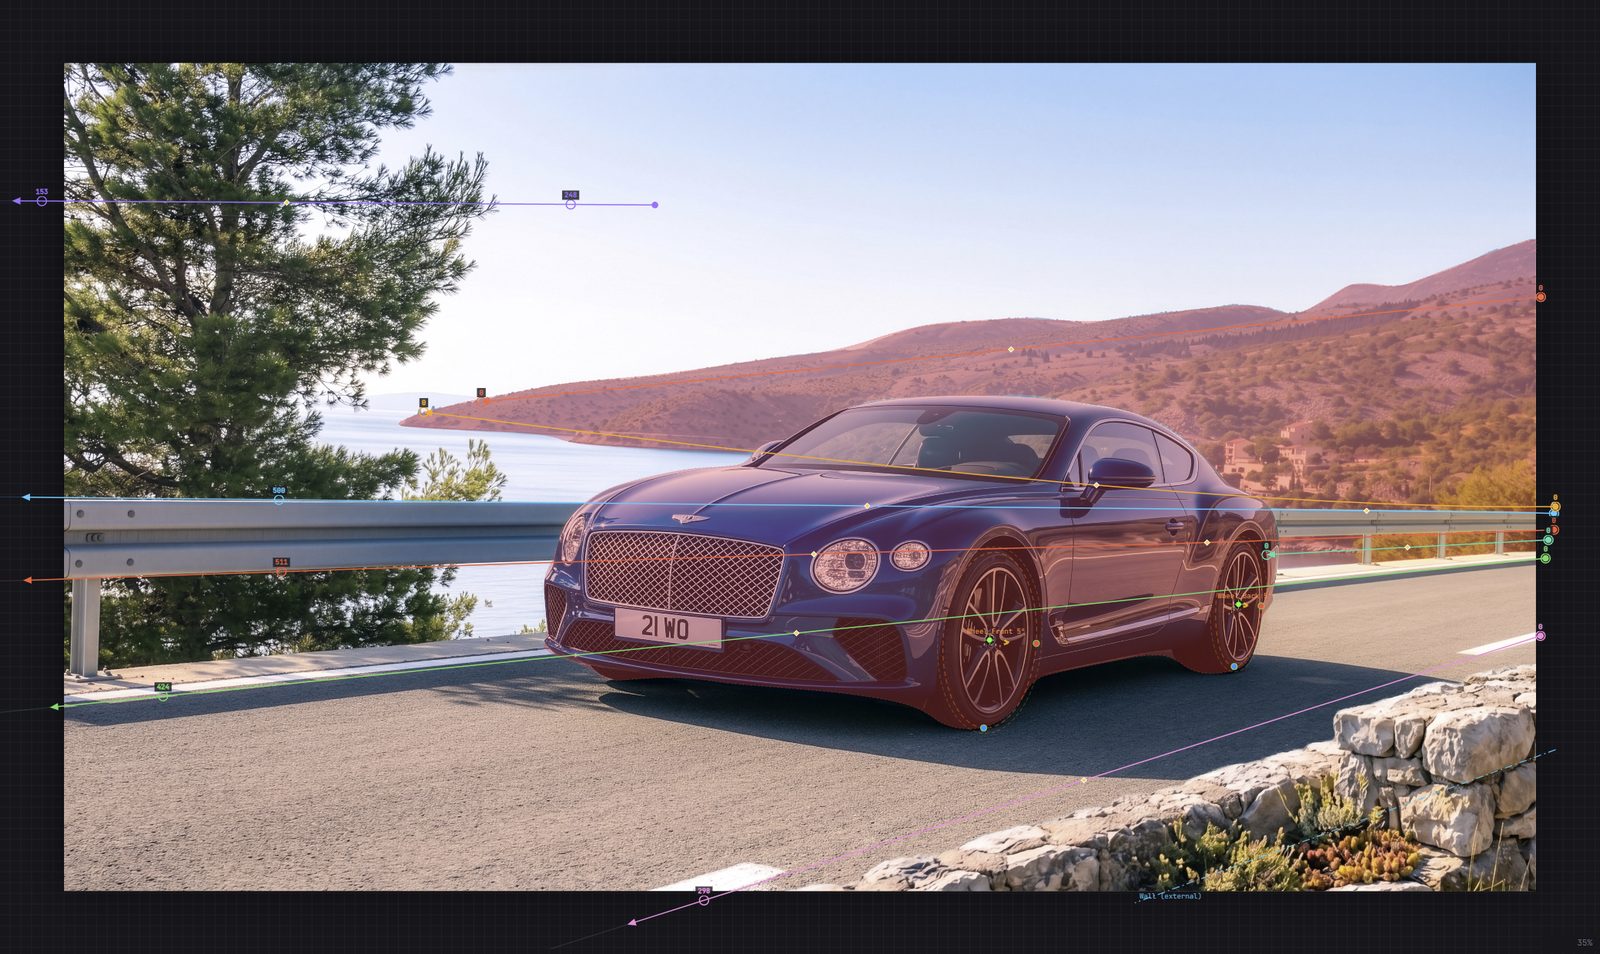
Inspect the purple car mask: include bodywork and exclude the road and cast shadow. SAM produces a soft raster mask; drawing or editing outline nodes produces a vector outline instead. After applying, use Brush/Eraser to correct raster edges without converting to a spline.
Wheels & tires
Wheel geometry keeps the Original AI proposal selected after analysis. Choose Local refinement to compare the pixel-based rim and tyre fit before applying; switch back if it includes bodywork or worsens an ellipse. Manual wheel adjustments take priority in both views.
Enable Apply metal rim round blur for the visible rims. In the proposal preview, the center handle moves the wheel and the axis handles resize its ellipse. Fit only the metal rim around the hub. Rubber is handled separately by the linked Tyre extension. After applying the rig, refine the ellipse and its rotation directly in the scene.
Contact shadow, explanation & diagnostics
The optional contact-shadow controls prepare a road/ shadow approximation; inspect the preview for halos before including it. Read Analysis and assumptions. Under Model response · diagnostics, Copy JSON copies the model response; the text field is also selectable. Include that JSON and a screenshot when reporting geometry errors.
Apply and continue editing
Add proposal to scene replaces the scene's vectors, splines, masks and wheel radials; Undo restores the previous rig. Finish or cancel any mask drawing or road calibration first. Apply is unavailable while required geometry is unfinished or invalid. Once applied, normal scene controls edit the rig independently of the assistant preview.
Open Tire Blur prototype → Apply to scene is a separate action: it attaches Tyre parameters to a matching rim or creates a new radial. Apply the main rig first, then adjust the tyre. The current wheel controls live in the scene's Splines panel, not in a new raster layer.
Compact scenes and projects
Portable and Linked
In Save Project choose Portable for a single self-contained file, or Linked for a smaller project with external resources. Original HDR data is retained in both modes. New single-scene saves offer the same choice. Saving again to the same path keeps that file's mode; use Save As to choose another mode.
Linked saves create a filename.vrproj.assets or filename.vrp.assets folder beside the document, including generated layers and pasted images. Move or share the document and its resources folder together. Relative links survive moving the pair to a new directory. Missing or changed resources are reported on opening. Restore the folder before retrying. Linked mode reduces the document size, not the total image data stored on disk.
To create one transferable file, open the linked document and Save As Portable. Resource files left by earlier saves are retained to protect other copies and recovery files; no automatic cleanup is performed. New linked files require build092 or later. Autosave recovery copies retain full image data.
Build091 saves .vrp scenes and .vrproj projects in a lossless binary container. Embedded images, raster masks and layer images retain their exact original bytes; identical embedded content is stored once per file. Metadata and compressible assets are compressed. Identical streamed HDR sources also share a single stored copy.
Existing JSON and VRPJ projects remain readable. New compact files require build091 or later. Original files are not converted until you save them: use Save As to keep a copy for an older version. Scene image links and project embedding choices keep their existing meaning; compression does not automatically embed external images.
Autosave and recovery use the same compact format and atomic save protections. Separate recovery files remain self-contained and can still occupy substantial space. Already compressed images and HDR files may shrink little; no resolution reduction or lossy recompression is applied.
AI troubleshooting
API connections: for rejected keys or quota errors, check your provider account and API billing. No calls are automatically retried or redirected to another provider. Cancel stops the local request; usage already processed by the provider may still be billed. If secure storage is unavailable, unlock your system keychain. Keys are not exported with projects or included in diagnostics. A model appearing in the API list is not a guarantee that it supports this image-analysis request.
| Symptom | What to check |
|---|---|
| Analyze unavailable | Load an image, activate VectorRIG, complete the selected runtime's account sign-in, then Check connection. Wait for or cancel an existing analysis. |
| Runtime not found | Install the official runtime on this computer. Claude offers Locate Claude Code. On macOS select claude, on Windows claude.exe. |
| Unexpected model list | Use Find models and check the selected account. Model availability comes from the runtime; no particular ChatGPT model is guaranteed. |
| Analyze is slow | Read stage timings to distinguish the online response from SAM and local fitting. First-use model downloads can add setup time. |
| Road vectors point incorrectly | Inspect the geometry source and guide lines; calibrate real road markings. Correct the vanishing point and Road flow separately. Do not accept a conflicting local fit solely because its residual is low. |
| Mask contains road or misses bodywork | Review SAM refinement; use Brush/Eraser after applying. Display transparency does not change the rendered protection. |
| Wheel ellipse or tyre is incorrect | Fit the metal rim first, then configure the rubber. See wheel troubleshooting. |
Tool Reference
| Tool | Key | Description |
|---|---|---|
| Select | V | Select, move and edit splines, vectors, radial blurs and masks |
| Vector | D | Draw a single straight blur vector |
| Blurrer | B | Draw a multi-point blurrer spline |
| Radial | R | Place a radial blur — wheels, fans, propellers |
| Tire Blur | Toolbar | Enable Tyre on the selected main radial or drag a new linked wheel |
| Move | H | Pan the canvas |
| Zoom | Z | Click to zoom in; E fits the image |
| Move Layer | G | Drag the selected layer on the canvas |
| Warp Layer | W | Four-corner warp of a layer |
| Cutout | U | Extract a region as a layer — drag for a rectangle, Shift for lasso, Ctrl for a spline |
Spline Editing
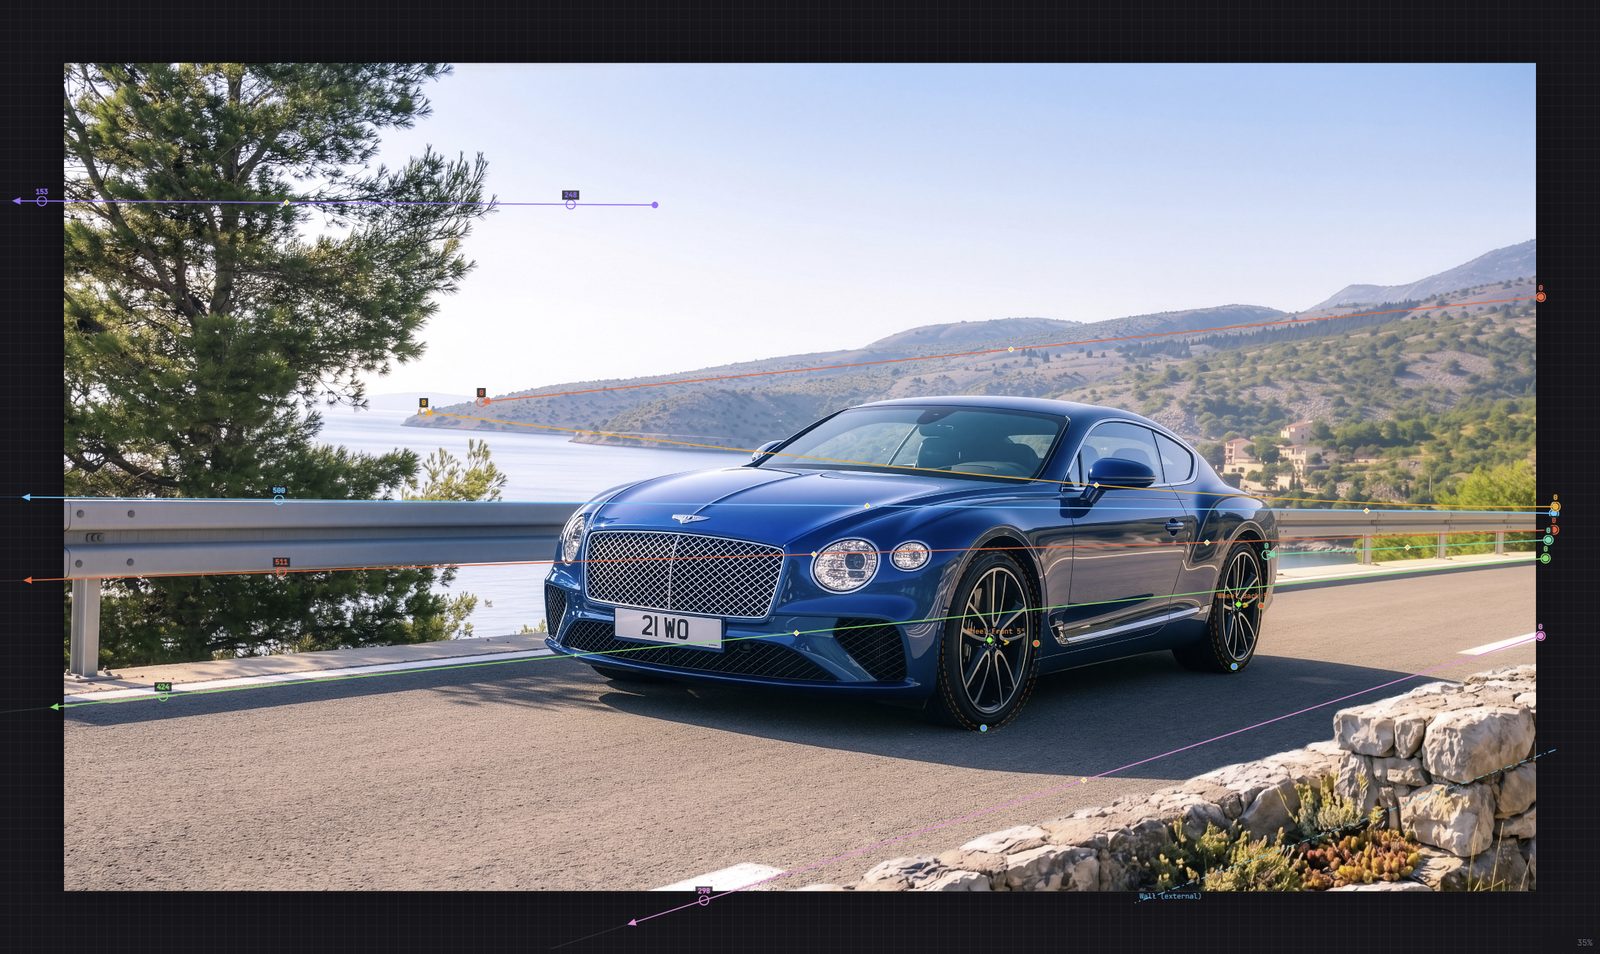
A blurrer spline describes where the scene is moving and how fast. Its control points reshape the curve; the two diamond knots along it set the start and end coefficients, which taper the blur so it grows from nothing and fades back to nothing rather than stopping abruptly. The length badge reports the effective travel in pixels.
Several splines can act on one image: the engine triangulates their points and interpolates between them, so the movement varies smoothly across the frame instead of being uniform. That is what makes a road recede convincingly — a long spline near the camera, a short one at the horizon.
Vectors
A vector is the simple case of a spline: one straight arrow from start to end. They are listed separately in the Splines tab and can be referenced by layers exactly like splines. Use them where the movement is genuinely uniform and a curve would be overkill.
Radial Blur · metal rim
Use Radial (R) and drag an ellipse over the visible metal rim. Select the radial in the Splines panel to edit its controls. This is an elliptical 2D rotational blur that approximates perspective; it does not reconstruct hidden wheel geometry.
| Control | Use |
|---|---|
| Radius X / Radius Y | Fit the two axes to the metal rim. Drag the axis knots in the viewport; hold Shift while resizing to preserve proportions. |
| Scale (%) | Resize the rim uniformly; the linked tyre follows the changed rim size. |
| Rotation | Tilt the ellipse to match the rim. Drag the orange knot above it in Select or Radial mode. Shift snaps to 5°. |
| Speed (°) | Adjust rotational effect strength, not vehicle speed in km/h or wheel RPM. Zero stops wheel rotation. The assistant's rotation arc is converted to the scene's radial-strength convention. |
| Feather | Soften the outer blend edge. Keep the visible coverage on the intended rim. |
| Inner (%) | Preserve a central region, such as the center cap. |
| Hub X / Hub Y | Offset the rotation axis from the ellipse center if the fit requires it. |
Rectangle selection includes visible radials when their centers are inside the rectangle. A linked Tyre belongs to its radial: moving, duplicating or deleting the wheel carries the tyre with it. Car protection masks are applied before wheel effects; use a fender cutout for bodywork that must cover the rotating wheel.
Tyre · sidewall & tread
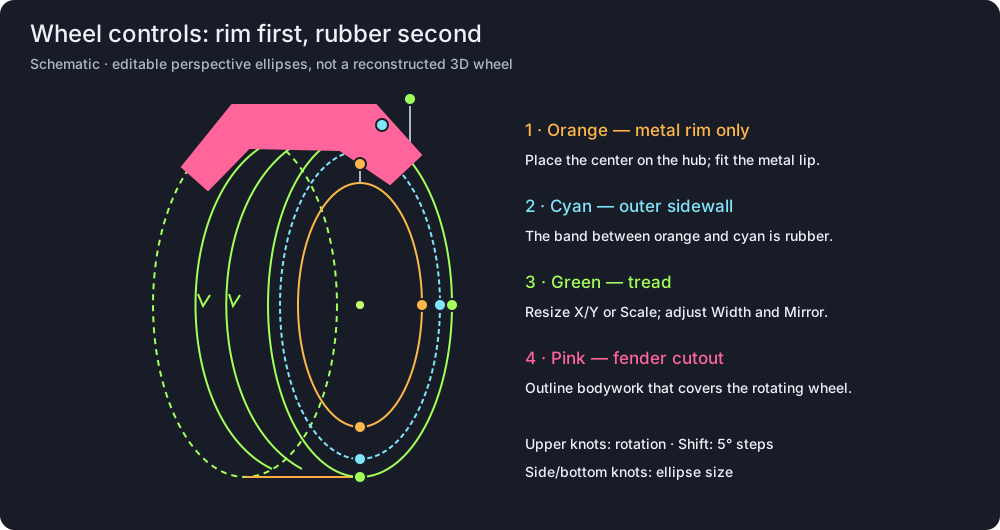
- Fit the orange radial to the metal rim only.
- Select it and enable Enable tyre in its controls, or use Tire Blur in the toolbar. With no radial selected, Tire Blur lets you drag a new rim ellipse with Tyre enabled. No AI connection is needed.
- Fit the cyan ellipse with Outer radius and Tyre rotation (°).
- Fit the green tread ellipse with its viewport axis knots, Tread scale, X/Y ratios and Tread rotation (°). Adjust Tread width and Mirror for the visible side.
- Set a nonzero radial Speed, then tune Blur multiplier. Add a fender cutout where bodywork overlaps.
The sidewall is an annular region outside the metal rim; the tread is an approximate cylindrical band. Enable the viewport path/guide display to see its ellipses and motion guides. The extension is saved with the radial in scenes and presets. It remains editable after applying an AI proposal.
Wheel handles & controls
| Geometry | Control and linkage |
|---|---|
| Orange · rim | Axis knots resize the rim; its upper knot rotates the complete linked wheel. |
| Cyan · sidewall reference | Outer radius scales it relative to the rim. Its cyan upper knot or Tyre rotation (°) tilts both tyre ellipses relative to the rim. |
| Green · outer tread | Right and bottom knots resize its axes; Shift preserves proportions. Its upper knot or Tread rotation (°) adjusts tilt relative to cyan. Green-only edits leave the rim and cyan ellipse unchanged. |
| All rotation knots | Drag in Select or Radial mode. Hold Shift for 5° steps. Undo restores the edit. |
| Green curves and arrows | Show the projected tread rotation. They are guides, not individually editable motion splines. |
| Orange upper/lower connectors | Show the projected cylinder width. They follow the tyre orientation. |
| Tyre setting | Meaning |
|---|---|
| Tread radius X × cyan / Y × cyan | Independent green-to-cyan radius ratios (1–1.6, default 1.05). Changing cyan size preserves these ratios. |
| Tread scale | Uniform green scale (1–2, default 1), preserving the X/Y proportions. Guide and blur coverage both follow it. |
| Tread rotation (°) | Additional green tilt relative to cyan. Rotating cyan later retains this relative offset. |
| Tread width | Projected depth of the tread band; it is not the ellipse height. |
| Mirror | Switch the band to the other side. It does not flip the source photograph or fender cutout. |
| Blur multiplier | Scale tyre blur relative to radial Speed. It does not resize the tyre or alter the metal-rim strength. |
This 2.5D approximation uses visible pixels, not a full 3D cylinder with reconstructed hidden texture. Green sizing/tilt controls adjust the tyre effect, not only its overlay. Standard preview and image rendering use the same tyre worker with CPU or GPU selected. The tyre extension uses 8-bit pixels; it does not provide native HDR precision.
Fender cutout · keep bodywork sharp
- Select the wheel and choose Draw fender cutout in its Tyre controls.
- Click along the wheel arch where the fender overlaps the tyre, then close the polygon through the bodywork above it. Outline the bodywork to preserve, not the rubber to blur.
- Press Finish cutout, Enter or the first point to close. The selected bodywork area remains sharp in front of the wheel effect.
- Use Redraw fender cutout to replace it, Clear cutout to remove it, or Cancel/Esc to discard unfinished drawing.
The cutout is stored on the wheel, not as a separate layer. It follows whole-rim position, size and rotation; independent tyre rotation and Mirror do not move it. Use enough polygon points to follow a curved arch. Simple top cutoff is the older straight-band shortcut; drawing a shaped cutout replaces it.
Wheel troubleshooting
| Symptom | Correction |
|---|---|
| Wheel stays sharp | Check radial visibility and Speed: 0 stops rotation. For rubber, also enable Tyre and raise Blur multiplier. Changing the car mask's display transparency cannot start or stop blur. |
| Blur extends onto the tyre when fitting the rim | Shrink the orange ellipse to metal only. Use cyan/green tyre controls for the rubber. Previously saved wheel sizes are not automatically corrected. |
| Tread appears on the wrong side | Use Mirror, then adjust Tread width. |
| Green ellipse is off-axis | Use its own upper rotation knot or Tread rotation. Adjust the right/bottom knots to fit its axes. |
| Fender smears or wheel appears over bodywork | Draw a fender cutout; the general car mask does not replace this wheel-specific occlusion. |
| Handles are missing | Show the viewport paths/guides, select the main-scene radial and enable Tyre. Linked Tyre controls are available for main-scene radials. |
| Effect is doubled | Check for a retained raster Tire Blur layer from an earlier build. |
| GPU differs at high speed | Compare the same scene, output resolution, quality and jitter settings using CPU and GPU. Use the CPU result if it is cleaner and report the saved project plus both renders. |
Layer System
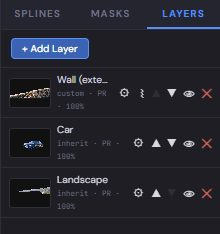
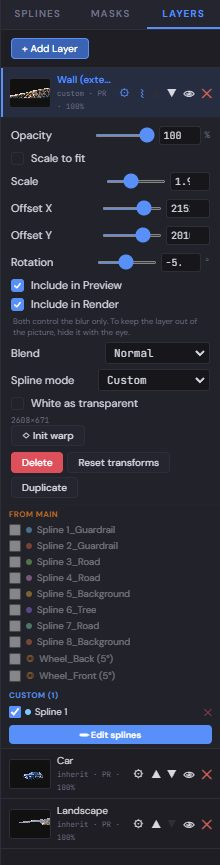
Layers sit over the scene and are composited into both the preview and the render. Each has opacity, scale, offset, rotation, one of eleven blend modes, an optional white-as-transparent conversion, an optional four-corner warp, and its own blur behaviour.
Order matters: the list is top-first, and the arrows reorder it. The eye toggles a layer's visibility, and it is the only control that decides whether a layer appears at all — the two blur flags below never remove it from the picture.
Layer Tools
| Tool | Description |
|---|---|
| Direct drag | With the Layers tab open, drag on the canvas to move the topmost layer under the pointer |
| Move Layer (G) | The same gesture as an explicit tool |
| Warp (W) | Four corner pins; drag any of them to distort the layer |
| Cutout Rect (U, drag) | Rectangle → layer |
| Cutout Lasso (U+Shift) | Freehand → layer with transparency |
| Cutout Spline (U+Ctrl) | Spline points, Enter → layer with smooth edges |
| Extract from Mask | Masks tab → ✂ Extract as layer |
Layer Blur
Two checkboxes decide whether the blur reaches a layer, one per context: Include in Preview and Include in Render. Both are on by default, and both control the blur only — a layer excluded from the render blur is still composited into the render, just sharp. To keep a layer out of the picture entirely, hide it with the eye.
Where the movement comes from is set by the spline mode. Inherit main uses the scene's own splines, so the layer moves with everything else. Custom lets the layer pick individual scene splines and draw its own, which is how a reflection or a duplicated subject is given movement that differs from the background.
A layer's own splines are drawn on the canvas as dash-dot curves labelled with the layer's name, and appear in the Splines tab under a Custom · <layer> heading. Clicking one — on the canvas, in that list, or in the layer's own ⌇ list — enters that layer's editing context, where the canvas belongs to the splines and the layer itself is locked until you leave.
Mask System
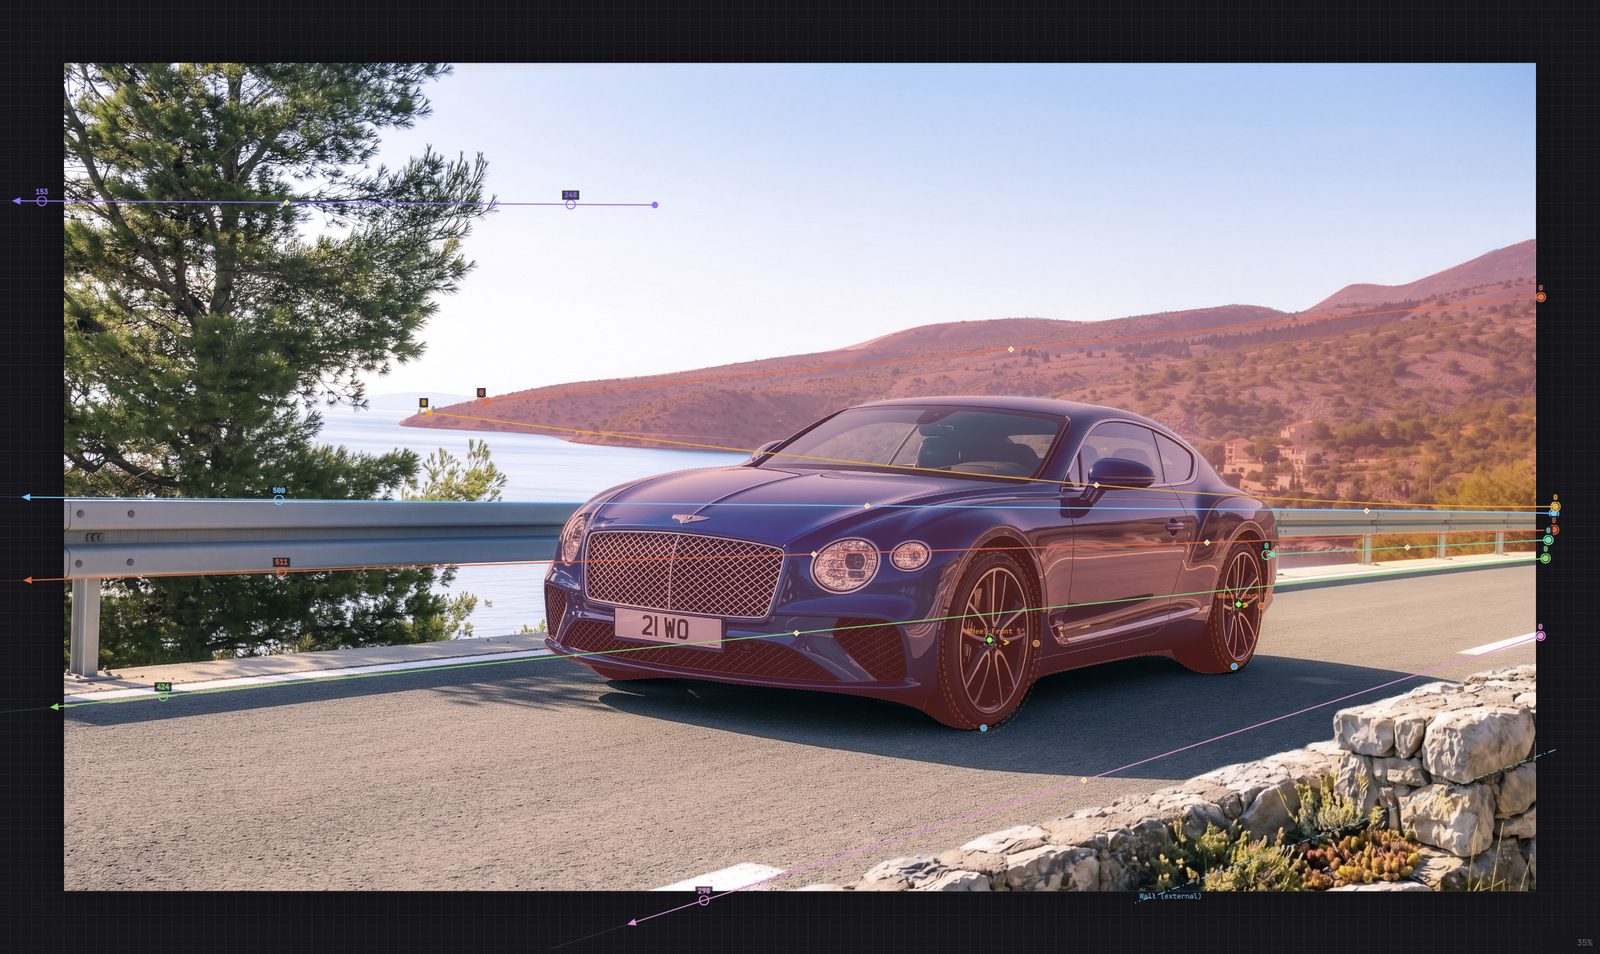
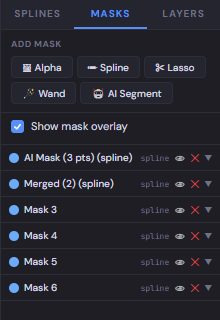
A mask protects an area from the blur: white keeps the pixels sharp, transparent lets the blur through. This is what keeps the subject crisp while the world moves around it. Masks can be merged, subtracted from one another and grouped, and any mask can be turned into a layer with ✂ Extract as layer.
Raster correction: open Brush/Eraser for imprecise SAM edges; converting to a spline is optional. Use Brush · Add or Eraser · Remove, set Size and Softness, zoom for fine edges, then Apply mask changes. Undo stroke reverses a stroke; Cancel discards the editing session. Display transparency changes the colored overlay only. Strength changes protection in the render.
Mask Tools
| Tool | Description |
|---|---|
| 🖼 Alpha | Load a black-and-white image as a mask |
| ✏ Spline | Click to place points, Enter or a click on the first point to close. A point placed normally is rounded off; Ctrl-click places a straight corner, so the outline runs straight in and out of it. Hold Ctrl for every point and you have drawn a polygonal lasso. Corner vertices show as squares and rounded ones as circles; Ctrl-click an existing vertex to switch it between the two, and Alt-click an edge to insert one. |
| ✂ Lasso | Freehand drag |
| SAM | Local AI segmentation creates a raster protection mask. Download its model files on first use, then refine the result with Brush/Eraser. A raster mask does not have spline nodes unless converted. |
| 🪄 Wand | Colour-similarity selection, with add and subtract modifiers |
Render Settings
Resolution with scale presets and an aspect-ratio lock, output format (PNG, JPEG, TIFF, HDR, EXR), and a noise amount. The render composites every visible layer, applies the radial blurs after the linear pass, and writes into the scene's output folder.
Render Queue
Press + Queue beside Render to add the current scene to the queue and carry on working. Jobs run one at a time in the background and each is written to its own scene's output folder. The queue panel lists every job with its status, a live percentage for the one in flight, and a remove button; Clear finished tidies up completed and failed entries. A scene needs an output folder before it can be queued.
The queue is not the same as Batch Render: the queue accumulates scenes as you work, whereas Batch Render is a single modal pass over a set you choose up front.
Preview & Motion Paths
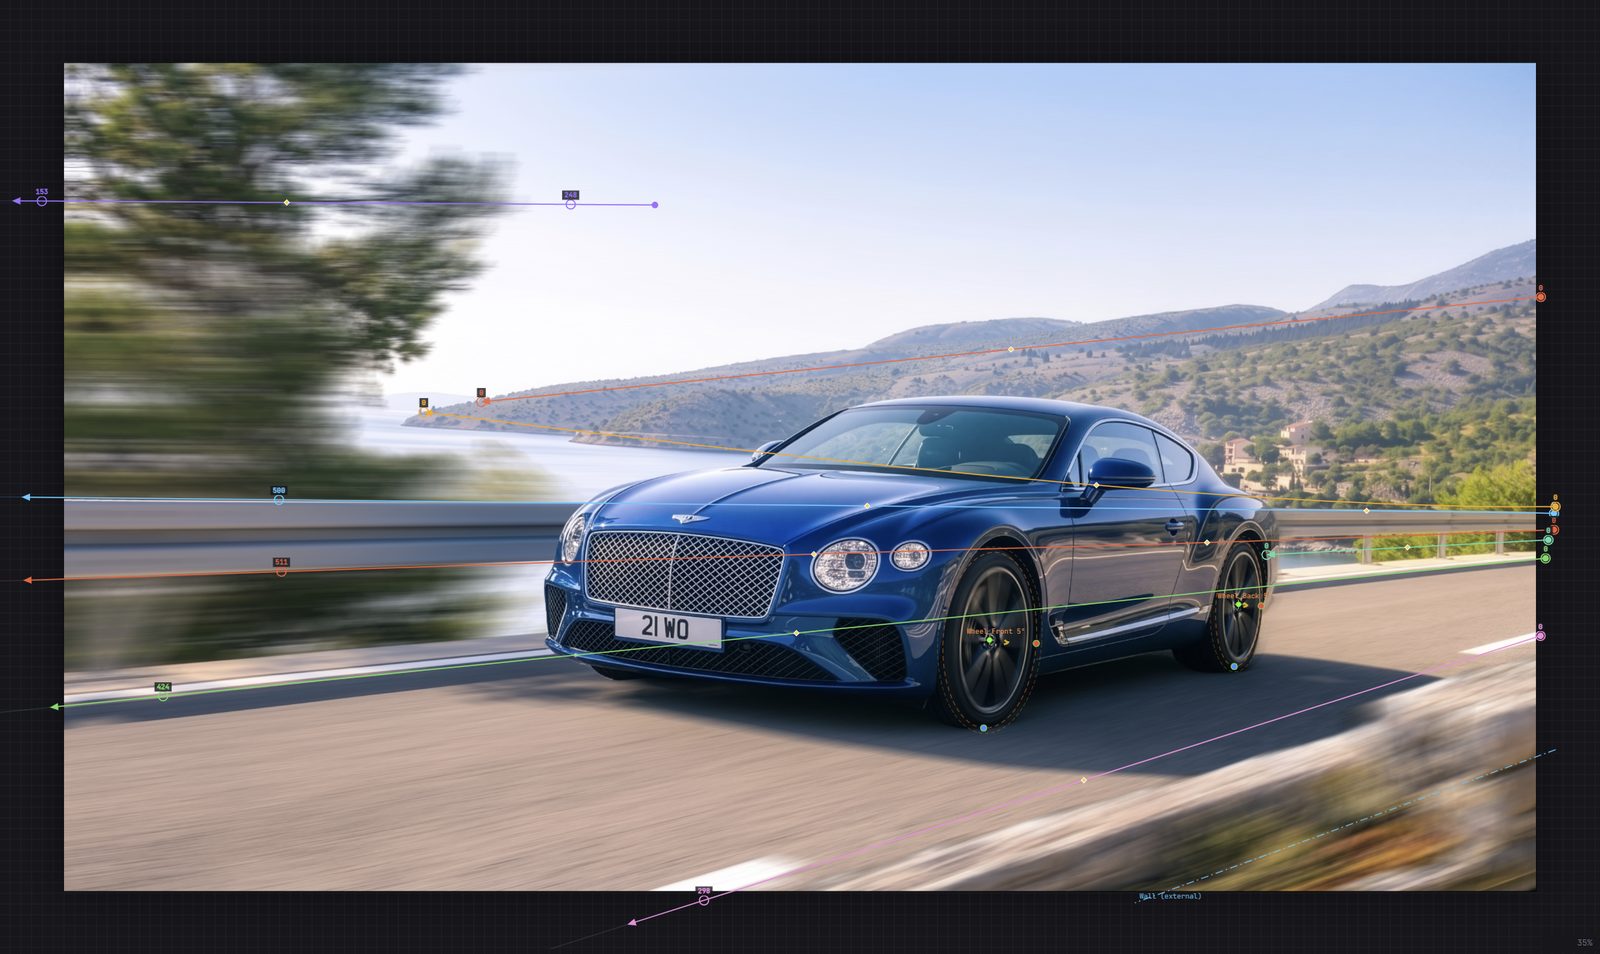
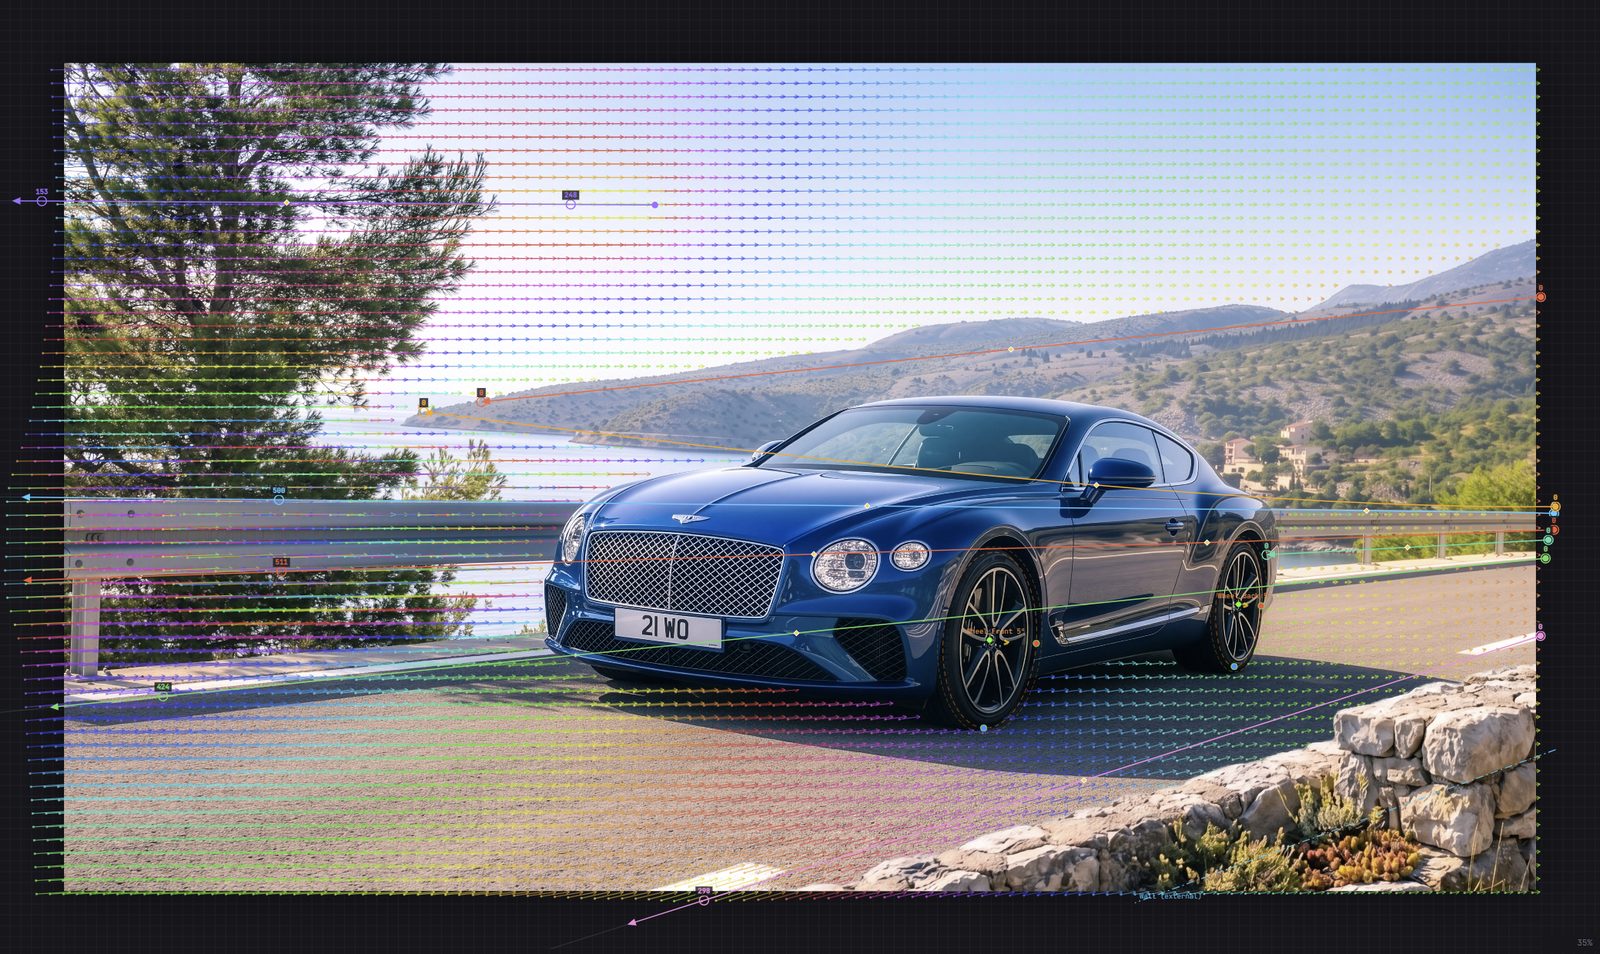
Preview renders the blur continuously at reduced resolution, layers and masks included, so the effect can be judged while the splines are being placed. Paths draws the vector field as a grid of arrows instead — useful for spotting a spline that is fighting its neighbours, or a region the field does not reach.
Compare A/B: compare the original image with the current rig preview using the divider. Use Full screen to inspect the result. Grid visibility, Snap, Spacing, Opacity and Color are grouped under HDRI / 360° → Grid. Paths length, opacity and density are in Display Settings.
Jitter Effect
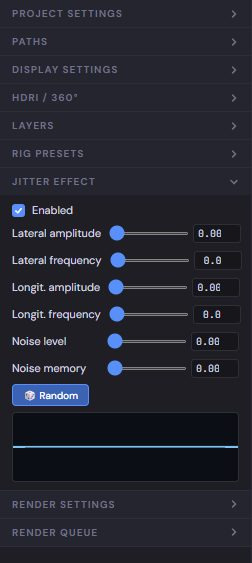
Jitter simulates camera shake during the exposure: lateral and longitudinal amplitude and frequency, a noise level, and a noise memory that controls how correlated one sample is with the last. A little of it stops a long exposure looking mechanically clean.
HDR & EXR
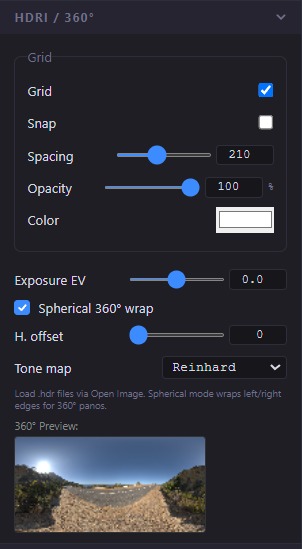
Radiance .hdr/.pic and OpenEXR .exr (NONE, ZIP, ZIPS and PIZ; half and full float) are read and processed in 32-bit float for the HDR blur workflow, so highlights survive instead of clipping to white. The optional Tyre extension is an 8-bit process; see its limitations above. Tone mapping runs on a worker, with an instant low-resolution preview.
Spherical 360° Mode
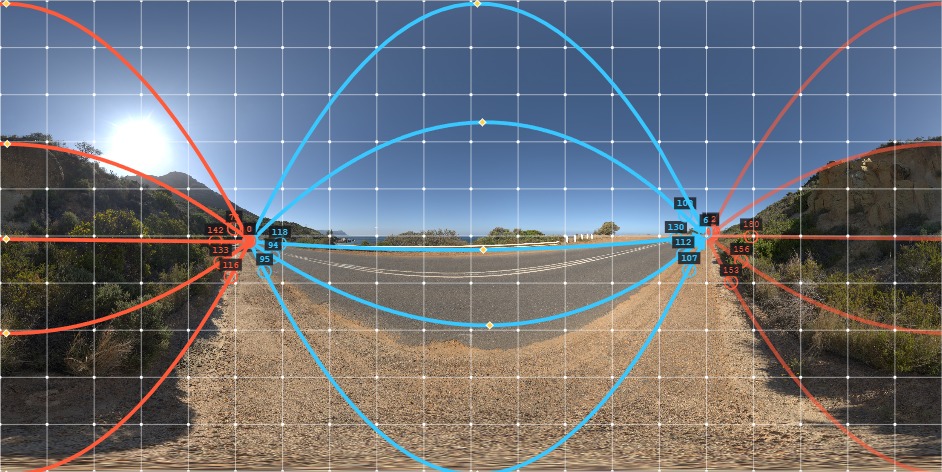
Grid: toggle visibility with the Grid checkbox above Snap. Grid spacing is fitted to an integer number of cells across the image width and height, so both borders are grid lines. Snap uses these same fitted intersections. Turning Grid off also turns Snap off and disables spacing, opacity and color. These controls are grouped in the Grid box under HDRI / 360°.
Select and move controls: click a spline path at any zoom, or drag a selection rectangle across it. A rectangle around several endpoints or knots selects those controls for a collective drag; dragging a selected path moves the selected splines as a whole. If a speed ring overlaps an endpoint at zero, drag its center to move the endpoint, or the surrounding ring to change speed. Wrapped copies display the same speed rings and values as their source.
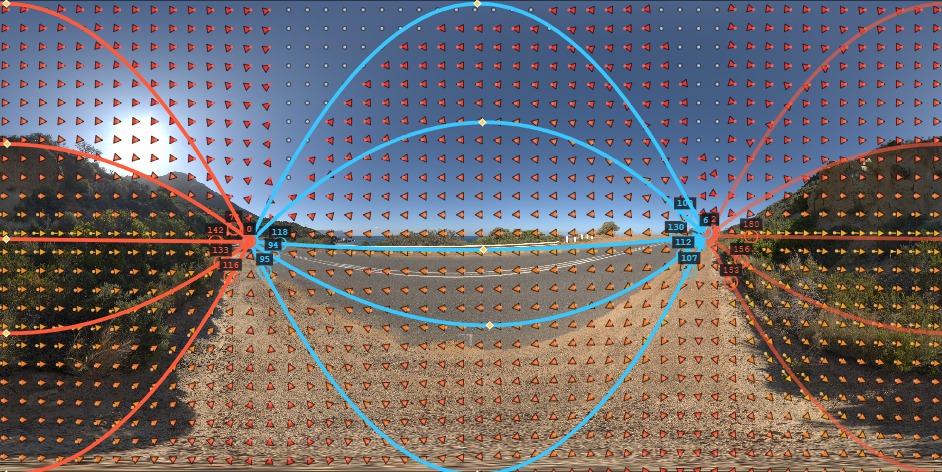
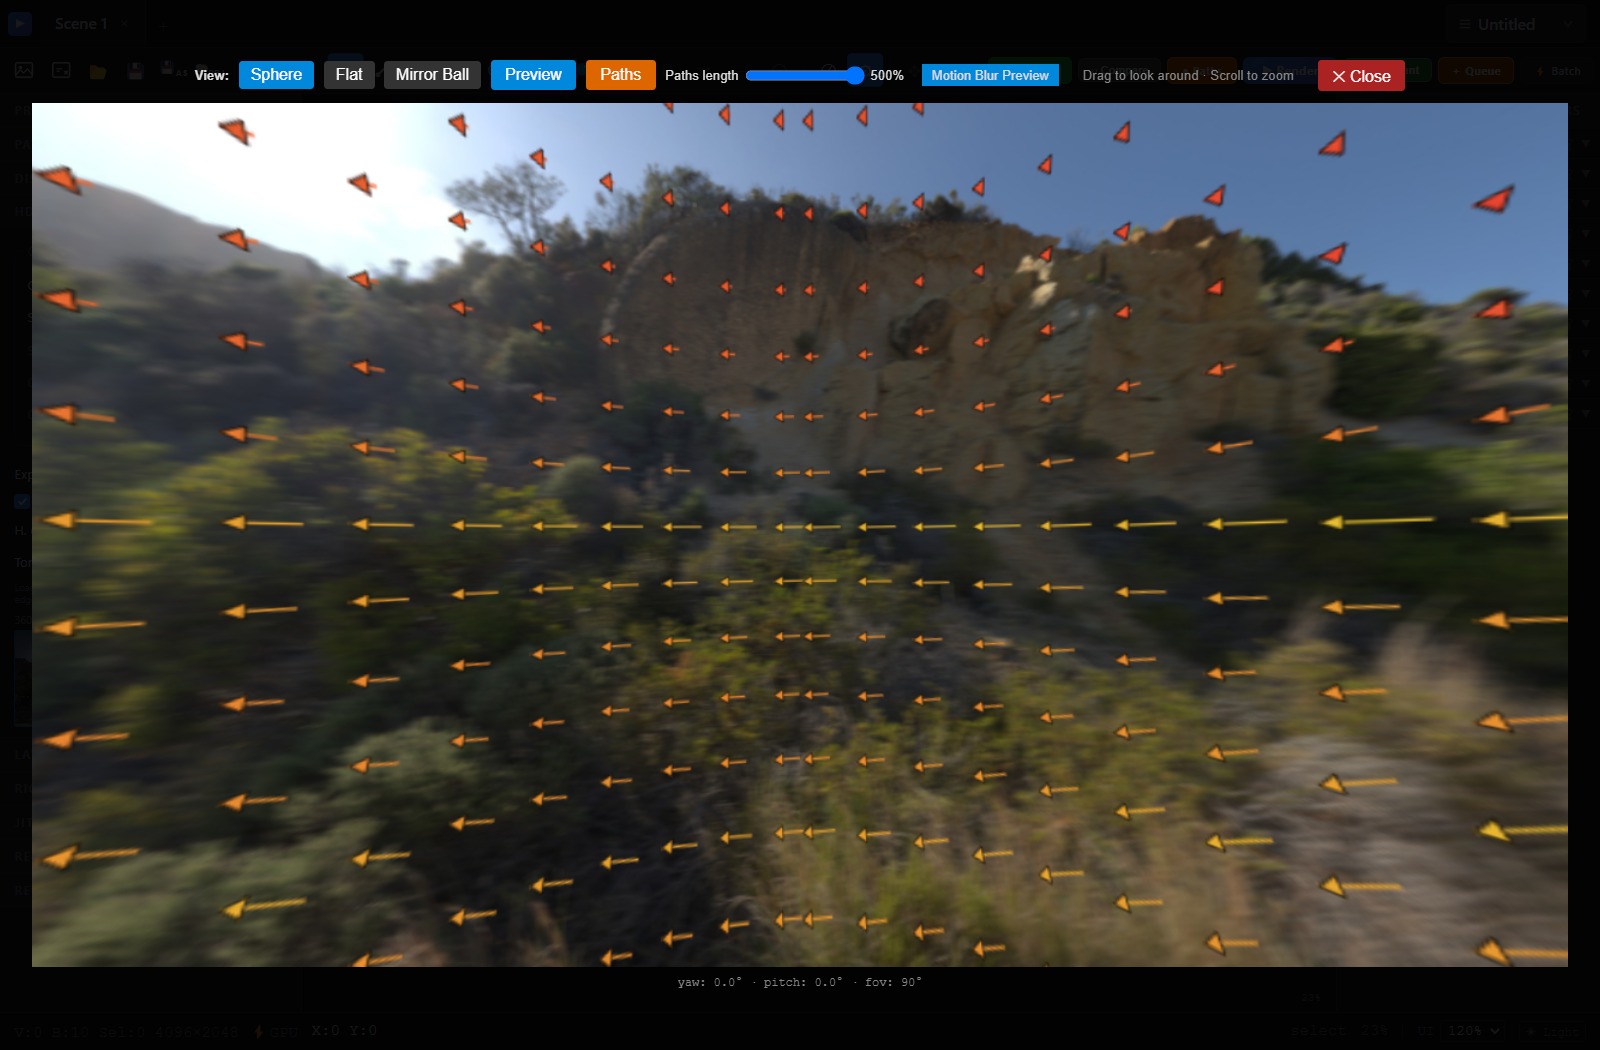
In the live 360° viewer, Preview switches motion blur on or off and Paths shows the motion field. Both controls share the main viewport settings. Paths length (10–500%, default 100%) scales only the displayed arrows, in both views. It does not change blur speed, direction or render settings; the display value is saved with the scene. Small neutral dots indicate valid near-zero motion samples; masked areas remain empty. Paths follow the panorama in Sphere, Flat and Mirror Ball views; you can combine them with the blur preview without closing the viewer.
In spherical mode the image is treated as equirectangular: the blur wraps across the left and right edges instead of stopping at them, and splines are ghosted at ±width so the vector field is continuous across the seam. A horizontal offset rotates the panorama without re-exporting it.
Tone Mapping
Reinhard, ACES Filmic or Linear, with an exposure slider in EV. The choice affects only the display and the 8-bit export; the float data is blurred before tone mapping, which is why an HDR source holds its highlights.
Case Study — car on a road
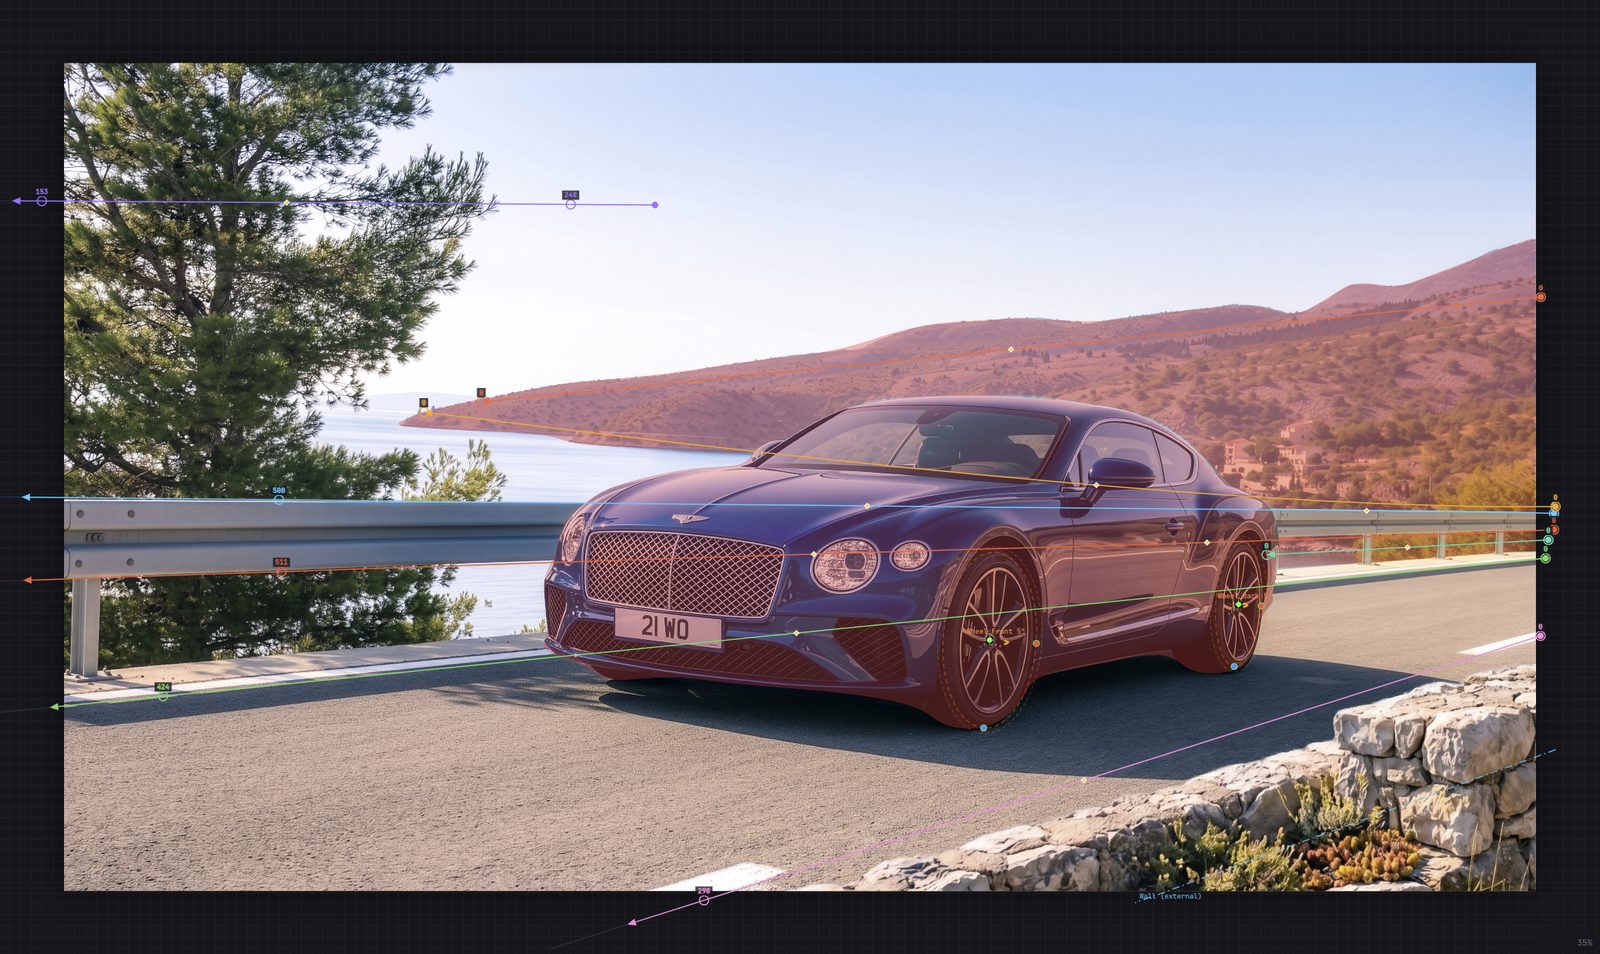
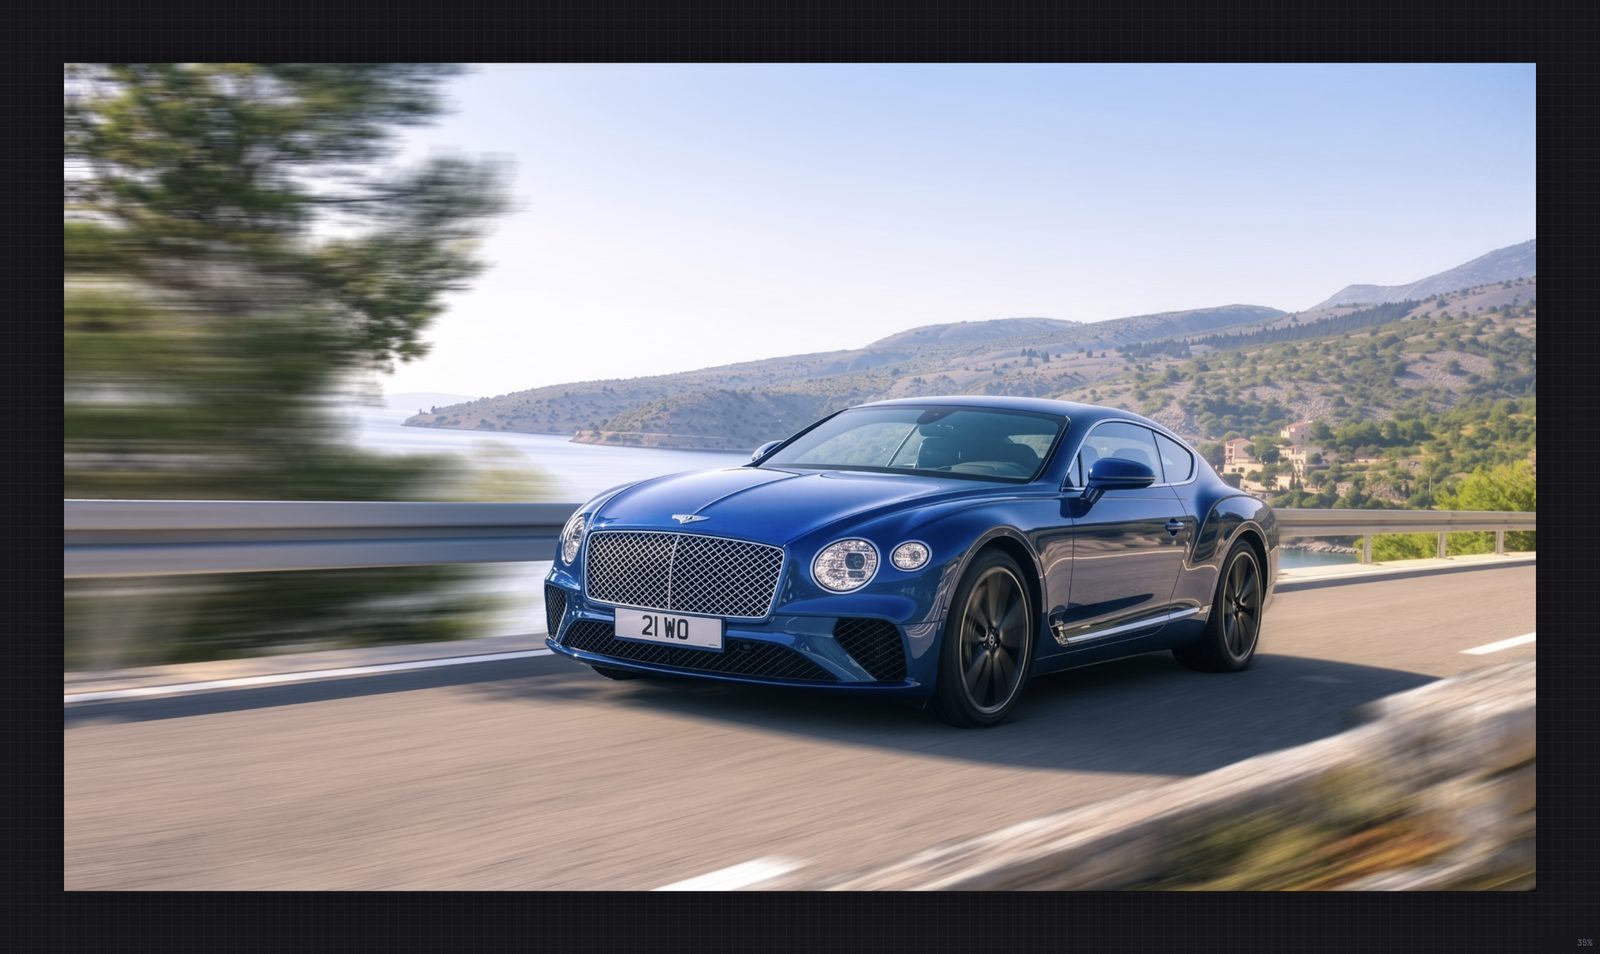
The complete path from a static photograph to a finished frame. The subject is a car photographed stationary on a coast road; the goal is a shot that reads as though it were taken from a tracking vehicle at speed.
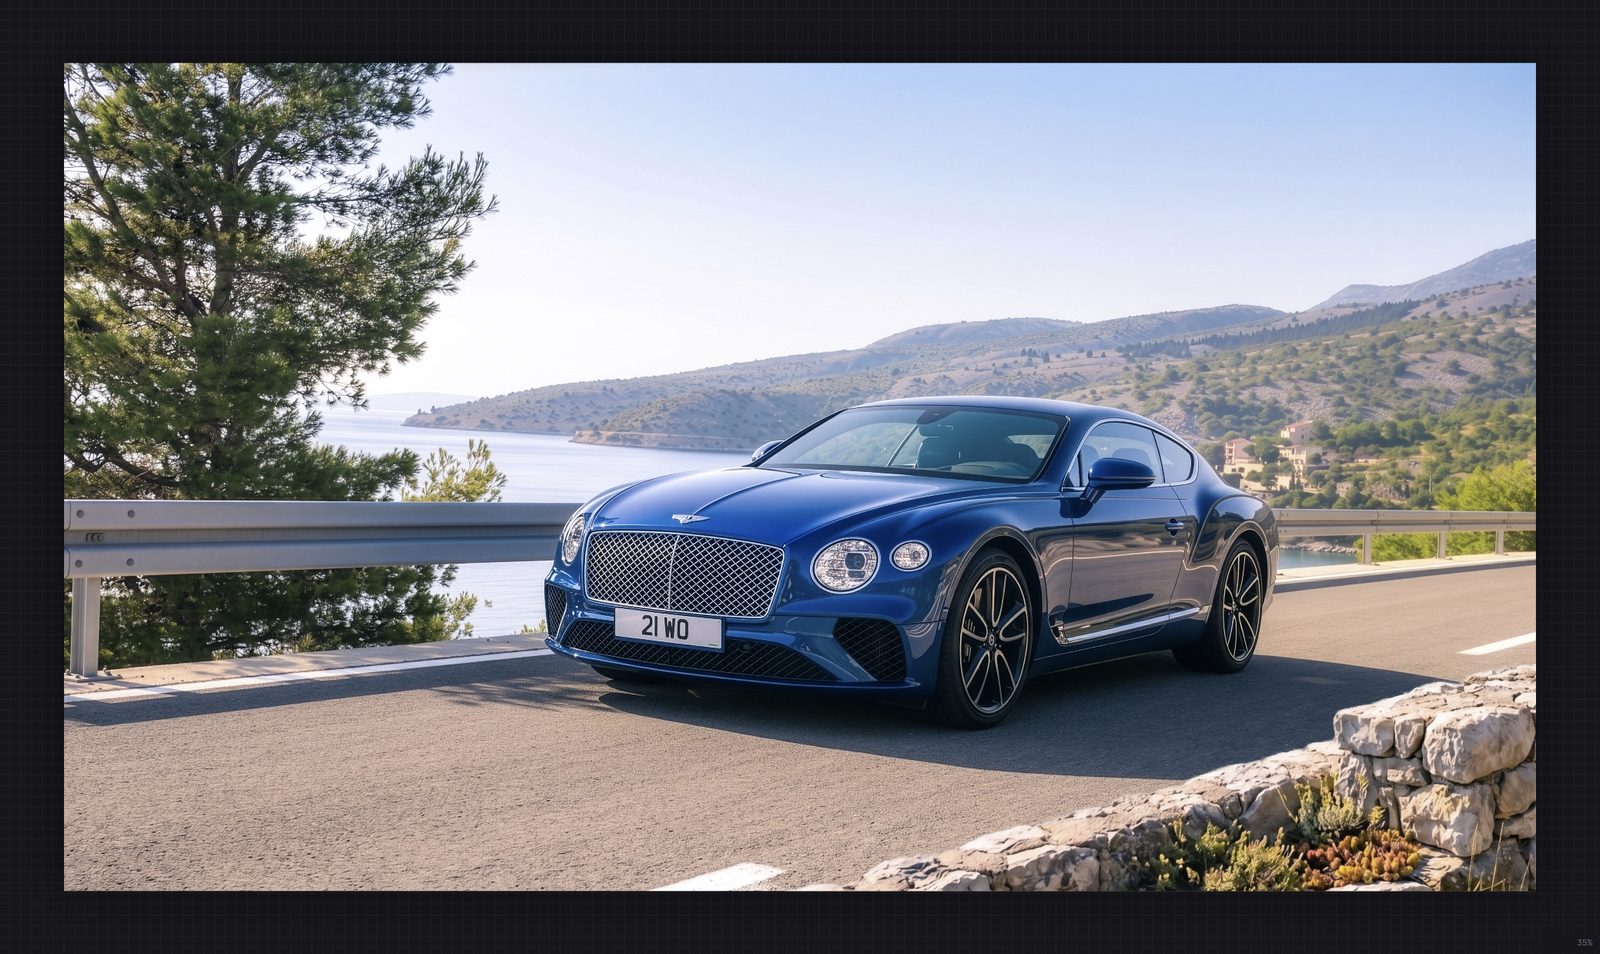
Read the movement. The camera is travelling with the car, so the car is the still element and the world moves past it. The movement runs along the road, converging towards the vanishing point: fast and near-horizontal at the edges of the frame, slower and shorter towards the horizon.
Place the splines. Three blurrer splines, each following a line the road already gives you — the near verge, the centre line, the guardrail. Longer near the camera, shorter towards the vanishing point. The engine interpolates between them, so the whole field recedes correctly without a spline for every region.
Mask the subject. The car must stay sharp. Draw a spline mask around it — rounded points along the bodywork, Ctrl-clicked corners at the glass and the number plate — or start from the wand and refine. With the mask enabled, the blur flows around the car instead of through it.
Spin the wheels. A car moving with sharp wheels reads as a car on a trailer. Place a radial blur on each wheel, matching the ellipse to the wheel's perspective and leaving a small inner radius so the hub stays readable.
Judge and render. Switch the preview on, raise the quality, and check the result at full size before committing. If the whole effect is too strong, the speed coefficient in Project Settings scales every spline at once — quicker than editing them individually.
Case Study — wheels only
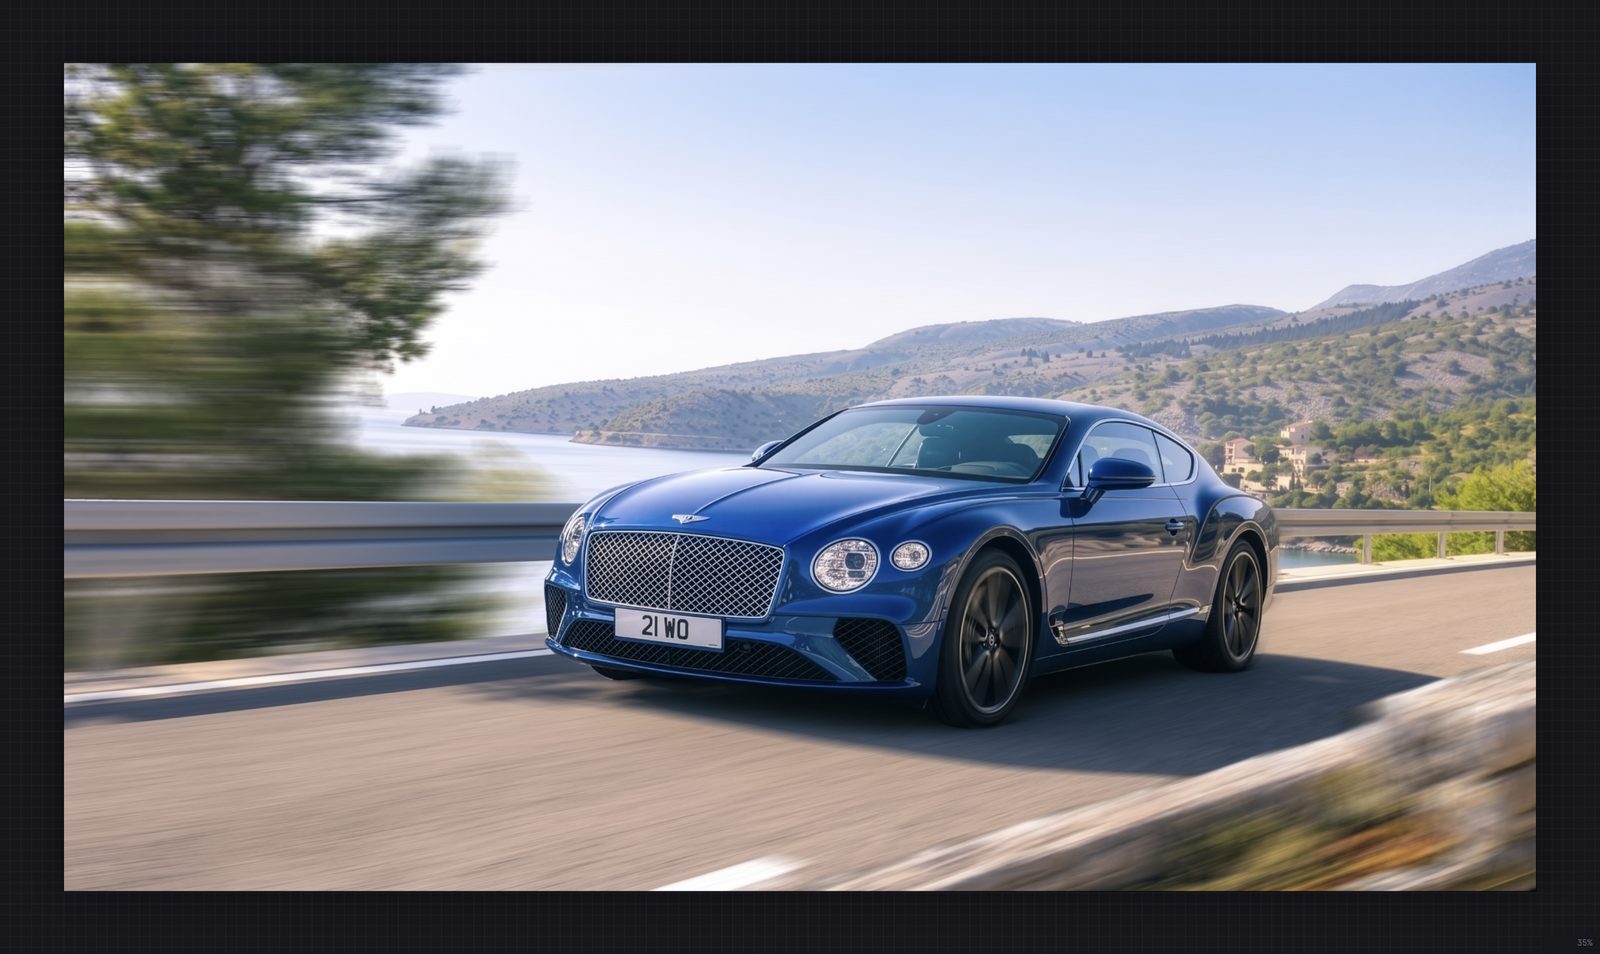
Not every shot needs the background to move. A car photographed at rest, for a configurator or a studio plate, often needs nothing more than turning wheels: the rest of the frame is deliberately still.
Skip the blurrer splines entirely. Place one radial blur per visible wheel, rotate its ellipse to match the wheel's perspective, and set the speed to taste — enough to lose the spoke detail at the rim while the centre cap stays legible. The inner radius is what keeps that centre readable; without it the whole wheel dissolves.
Case Study — Simons Town 360° panorama
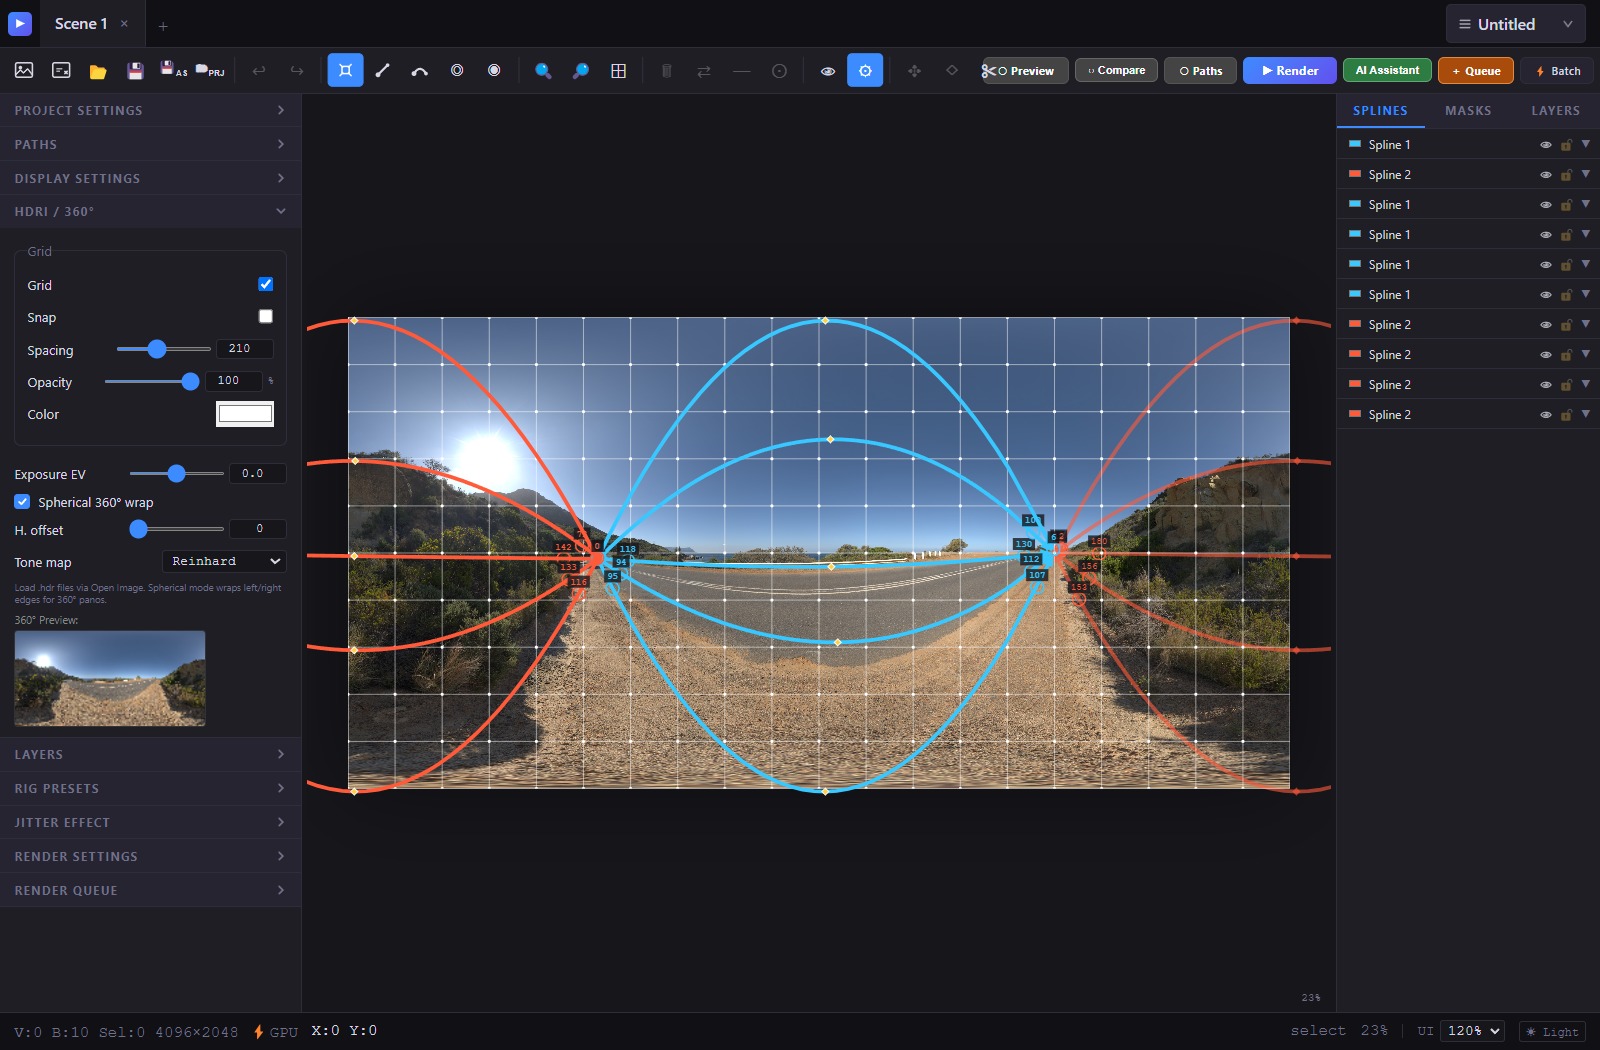
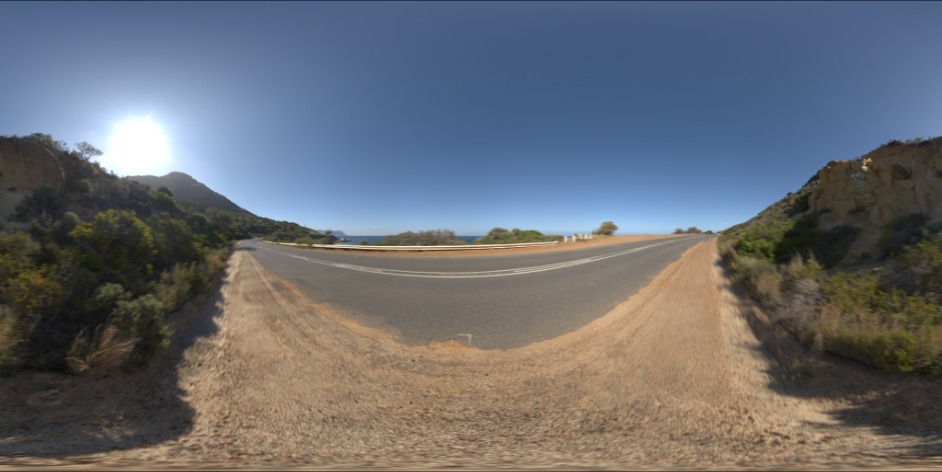
This example uses the saved Simons Town road scene: a 4096 × 2048 equirectangular JPEG with its horizontal offset already applied. It demonstrates spherical geometry; JPEG is an 8-bit source and does not contain HDR highlight information.
- Open the panorama or the saved scene. Enable Spherical 360° wrap; the scene remembers this setting.
- For a new panorama, use H. offset and Apply offset to place the seam away from the area you want to edit. An already shifted saved image needs no second offset.
- Fit the splines to the road direction. Drag wrapped endpoints, curve diamonds and speed rings on whichever side is visible. Both copies edit the same spline.
- Enable Grid in HDRI / 360°. Its fitted cells end exactly at the image borders. Enable Snap to place geometry on those same intersections. Turning Grid off disables Snap and the grid controls.
- Inspect Paths. Filled arrowheads make direction clear; neutral dots mark valid samples with near-zero motion. Protected or unavailable samples remain empty. Paths length changes the display only, never blur strength.
- Click the 360° thumbnail to open the live viewer. Drag to look around, scroll to zoom, and switch between Sphere, Flat and Mirror Ball. Preview and Paths can be enabled independently or together.
- Check the seam with Preview, then render. With an HDR/EXR source, tone mapping affects the display and 8-bit output; the HDR blur uses the floating-point source.
Keyboard Shortcuts
| Key | Action |
|---|---|
| V | Select |
| D | Vector |
| B | Blurrer |
| H | Move/Pan |
| G | Move Layer |
| W | Warp Layer |
| U | Cutout |
| E | Fit |
| Ctrl+N | New tab |
| Ctrl+S | Save |
| Ctrl+Z/Y | Undo/Redo |
| Ctrl+A | Select all |
| Ctrl+D | Duplicate |
| Del | Delete |
| Alt+Click | Insert point |
| I | Invert |
| 9 | Straighten |
| 0 | Zero |
| R | Radial tool |
| Shift + rotation knot | 5° steps for rim, cyan tyre or green tread |
| Shift + axis knot | Proportional rim or green-tread resizing |
| F1 | Help |
| F2 | Rename |
| Enter | Confirm |
| Esc | Cancel |
| Scroll | Zoom |
| Middle mouse | Pan |
File Formats
| Ext | Description |
|---|---|
.vrp | Single scene — image, splines, radials with Tyre settings, masks, layers and settings |
.vrproj | Multi-scene project containing scene tabs and shared project settings |
.hdr/.pic | Radiance HDR |
.png / .jpg | Standard image import/export; JPEG does not preserve transparency |
.tif | TIFF (8-bit RGBA) |
.exr | OpenEXR |
Licenses & Mac beta
VectorRIG uses one installer for all license plans. Start or resume the full 14-day Trial from the activation screen; saving and rendering are included. Trial dates are stored by the license server and reinstalling does not restart them. AI subscriptions and API usage remain your own, with no bundled AI credits.
Standard licenses allow two activated computers for one user, used on one computer at a time. Monthly (€49) and annual (€449) subscriptions provide access for the paid term. A perpetual license (€999) includes 12 months of maintenance. Optional maintenance renewal (€249) covers 12 months from the renewal purchase date, including updates and any upgrades released during that period, with no back payments. Prices exclude applicable taxes. Without renewal, previously entitled versions remain usable; installing a newer version may require renewed maintenance. Floating licensing is available on request.
Help → Manage License shows the plan, access expiry, maintenance entitlement and next online verification deadline. Expiry of a Trial or subscription is separate from the deadline for online verification. Standard licenses allow up to 7 days offline from the last successful verification, never beyond Trial or subscription expiry. Use on one computer at a time is a license condition.
VectorRIG activation and AI account access are separate. Enter your valid VectorRIG license in the activation screen with an internet connection. Then connect your own AI runtime account. An AI subscription does not activate VectorRIG.
The Apple Silicon beta uses a separate application profile. It does not contain the author's AI sessions or preactivated license. Use the supplied beta installation instructions; the private beta may be unsigned and is intended for testing. Report macOS version, Mac chip, build number and reproduction steps, without account credentials or license codes.
About
Vector//RIG Version 1.0
Professional Motion Blur Simulation
© 2026 Vector//RIG